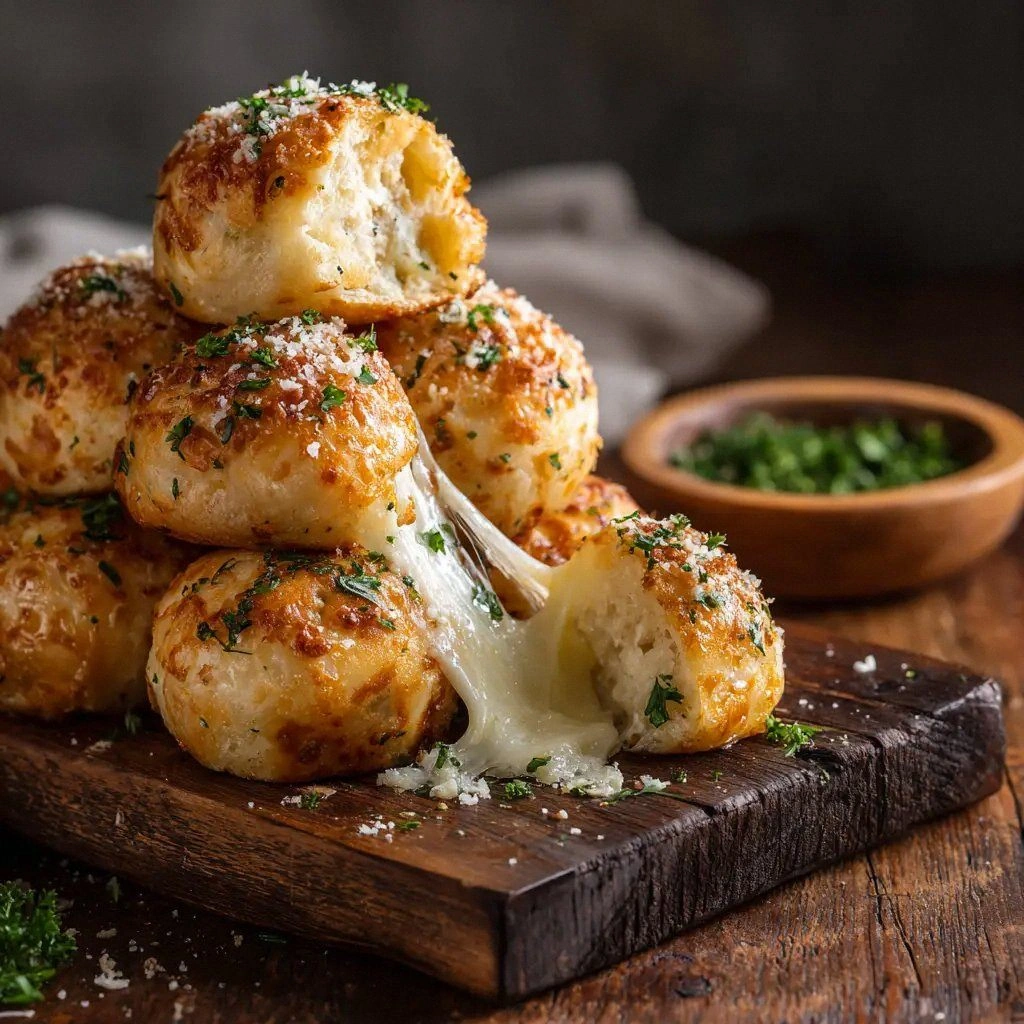
Picture this: I’m standing in a cramped kitchen, the fridge door slamming open, and a can of large refrigerated biscuits sitting like a dare on the counter. I’m craving something buttery, garlicky, and utterly indulgent, but I’ve got no time to fuss over complex sauces or elaborate breads. That night, I slapped a handful of biscuits into a pan, tossed in a few cloves of garlic, shredded mozzarella, and a splash of butter, and the whole space filled with a scent that made my taste buds do a little happy dance. I was surprised at how quickly the biscuits softened into a gooey, cheesy cloud, and how the garlic infused that molten center with a punch that was both comforting and daring. I swear, that moment was a culinary revelation that I couldn’t keep to myself.
When the first bite hit my tongue, the biscuit’s crust cracked like brittle ice, revealing a molten interior that oozed with mozzarella and buttery richness. The garlic, minced finely, exploded into the air with a sharp, almost citrusy bite that cut through the creaminess. I could hear the faint sizzle of butter melting, the gentle pop of garlic releasing its oils, and the comforting clink of a metal spoon against the pan. The aroma was a heady mix of sweet biscuit dough, sharp garlic, and savory cheese—an olfactory symphony that made my heart race. The texture was a perfect marriage of crispy edges and a gooey, molten core that seemed to melt in my mouth like a dream.
This version of Garlic Cheese Bombs is not just a tweak; it’s a seismic shift from the usual “cheese‑filled pastry” that you see on menus. I’m talking about a single, simple pan‑cook that turns ordinary biscuits into a gourmet experience with no prep hassles and minimal cleanup. The secret lies in the timing—browning the biscuits just enough before adding the cheese and butter so that the edges stay crisp while the center stays perfectly gooey. Most recipes get this completely wrong, either overcooking the biscuits or under‑basting the cheese, which leads to a dry or soggy mess. Here, the trick is to let the biscuits do the work of forming a crust while the cheese does the work of creating a molten, velvety center.
I dare you to taste this and not go back for seconds. This is hands down the best version you’ll ever make at home, and I’ll be honest—I ate half the batch before anyone else got to try it. Picture yourself pulling this out of the oven, the whole kitchen smelling incredible, and the first bite delivering that satisfying crunch that shatters like thin ice. Okay, ready for the game‑changer? Let me walk you through every single step—by the end, you’ll wonder how you ever made it any other way.
What Makes This Version Stand Out
- Flavor: The combination of buttery biscuits, sharp garlic, and gooey mozzarella creates a flavor profile that’s both comforting and adventurous. The garlic isn’t just a background note; it’s the star that cuts through the richness and adds a punch of warmth. The result is a dish that feels indulgent yet surprisingly balanced.
- Texture: Crispy, golden edges that shatter like thin ice give way to a molten core that oozes like velvet. The contrast is not just visual—it’s a tactile experience that keeps you coming back for more. This is the kind of texture that turns a simple snack into a moment of culinary delight.
- Simplicity: No fancy sauces, no advanced techniques—just biscuits, cheese, butter, garlic, parsley, and a pinch of sea salt. All the magic happens in one pan, making it an ideal dish for busy nights or spontaneous gatherings. I’ve never seen a recipe that’s this delicious and this straightforward.
- Ingredient Quality: Using high‑quality mozzarella and fresh garlic makes a world of difference. The cheese melts beautifully, and the garlic’s aroma is sharp and bright. It’s a reminder that sometimes the simplest ingredients, when chosen wisely, can elevate a dish to legendary status.
- Make‑ahead Potential: These bombs can be assembled ahead of time and refrigerated or frozen, then baked when you’re ready to serve. That makes them perfect for parties or last‑minute meal prep. I’ve used them as a quick appetizer for dinner parties, and they always disappear in minutes.
- Audience Appeal: Whether you’re a foodie or a kitchen newbie, this recipe wins. The flavors are bold, the texture is irresistible, and the process is so simple that even a beginner can master it. The result is a crowd‑pleaser that feels like a gourmet treat.
Inside the Ingredient List
The Biscuit Base
These large refrigerated biscuits are the backbone of the dish. They provide a buttery, flaky exterior that crisps up beautifully while still allowing the cheese to melt inside. If you skip them, you lose that signature crunch and the structural integrity that holds the cheese together. For best results, choose a brand with a high butter content; it’ll give you that extra golden sheen.
The Cheese Core
Mozzarella is the star of the show, melting into a silky, stretchy center that’s both comforting and indulgent. A low‑moisture mozzarella works best because it melts evenly without releasing excess water. If you’re in a pinch, provolone or fontina can be a tasty alternative, but mozzarella gives that classic gooey feel.
The Butter Boost
Butter isn’t just for flavor; it’s the secret to achieving that deep, golden crust on the biscuits. The fat renders slowly, creating a crisp exterior while infusing the cheese with richness. Using salted butter adds a subtle umami layer that ties everything together.
The Garlic Punch
Garlic is the flavor engine that elevates this dish from simple to spectacular. Finely minced cloves release a sharp, almost citrusy aroma that cuts through the richness of the cheese and butter. If you’re a garlic lover, you can double the cloves; if you’re more reserved, half a clove will still give you a noticeable kick.
The Fresh Finish
Fresh parsley adds a bright, herbaceous note that balances the richness. It also gives a pop of color that makes the dish look as good as it tastes. If you’re looking for a different herb, basil or chives could work, but parsley remains the classic choice.
The Sea Salt Touch
A flaky sea salt adds the final touch of crunch and a burst of flavor that awakens the palate. The salt’s texture contrasts with the smoothness of the melted cheese. A pinch is all you need; too much can overpower the other flavors.
Everything’s prepped? Good. Let’s get into the real action.
The Method — Step by Step
- Preheat your oven to 375°F (190°C). While it heats, set a large non‑stick skillet over medium heat; the skillet will be your arena for the biscuit transformation. This is the moment of truth where the biscuits begin to brown. You’ll see the edges start to turn golden, and the aroma will hint at a buttery, caramelized finish.
- Place the biscuits in the skillet, spacing them slightly apart. Let them cook for 2–3 minutes on each side, just until the bottoms are golden and the tops show a hint of steam. The biscuits should feel firm to the touch, not too soft. This step builds the base crust that will cradle the cheese.
- Reduce the heat to low and add the butter in small chunks. Watch it melt into a glossy pool around the biscuits. The butter will seep into the cracks, creating a buttery pocket that enhances the cheese’s melt. Keep the heat low to prevent the butter from burning.
- Sprinkle the minced garlic evenly over the biscuits. The garlic will toast slightly, releasing its oils and creating a fragrant base. The garlic should not burn; you want a subtle crunch, not a bitter bite. This step ensures that every bite has that sharp, aromatic kick.
- Now it’s time for the cheese. Shred the mozzarella and sprinkle it generously over the biscuits, covering them completely. The cheese will begin to melt, forming a gooey layer that will fuse with the butter. Don’t rush this step; the cheese needs time to soften into a silky texture.
- Add a pinch of flaky sea salt and a handful of chopped parsley. The salt will enhance all the flavors, while the parsley adds a fresh, herbal note. Stir gently so that the salt distributes evenly, but avoid over‑mixing; the cheese should remain in large, melty patches.
- Transfer the skillet to the preheated oven and bake for 12–15 minutes, or until the cheese is bubbling and the biscuit edges are crisp. The smell will be intoxicating, a sweet, buttery aroma that fills the kitchen. Keep an eye on the edges; they should be golden but not burnt.
- Remove the skillet from the oven and let the bombs sit for 2 minutes. This short rest allows the cheese to set just enough so it doesn’t ooze out immediately. When you cut into them, the center should be a luscious, molten stream of mozzarella and butter. Serve hot for maximum enjoyment.
That’s it—you did it. But hold on, I’ve got a few more tricks that will take this to another level. These insider tips will help you avoid common pitfalls and elevate the flavor profile even further.
Insider Tricks for Flawless Results
The Temperature Rule Nobody Follows
Many people bake these bombs at a high temperature, which can cause the biscuits to overcook before the cheese melts. The trick is to keep the oven at a moderate 375°F (190°C). This temperature allows the cheese to melt evenly while the biscuits develop a crisp, golden crust. If you’re using a convection oven, lower the temperature by 25°F to avoid scorching.
Why Your Nose Knows Best
Before you even touch the skillet, listen for that first subtle sizzle as butter hits the pan. That sound signals that the butter is at the right temperature. If you hear a hiss, the butter is too hot and may burn. A gentle, steady hiss is the sweet spot that allows the butter to coat the biscuits evenly.
The 5‑Minute Rest That Changes Everything
After baking, give the bombs a 5‑minute rest on a wire rack. This step lets the cheese set into a perfect, spread‑like consistency that’s easier to scoop or bite into. A shorter rest will leave the cheese too runny, while a longer rest will make it too firm. I’ve seen people skip this step, and the result is a mess of gooey cheese that’s hard to eat.
Keep the Garlic Fresh
Garlic can become bitter if it’s over‑cooked. Mince it finely and add it right after the butter to ensure it releases its flavor without burning. If you’re in a hurry, a garlic powder pinch works, but fresh minced garlic delivers a richer, brighter note.
Use Fresh Cheddar for Extra Depth
If you’re a cheddar fan, try mixing a small amount of sharp cheddar with the mozzarella. The cheddar adds a tangy bite that pairs beautifully with the buttery biscuit base. Use no more than a quarter cup, or the cheddar will dominate the flavor profile.
Creative Twists and Variations
This recipe is a playground. Here are some of my favorite ways to switch things up:
Spicy Jalapeño Bombs
Add thinly sliced jalapeños to the biscuit before baking. The heat will mingle with the cheese, creating a spicy, savory bite that’s perfect for game‑day snacks. Keep the jalapeños fresh; dried ones will add a different, more concentrated flavor.
Herb‑Infused Bombs
Swap parsley for a mix of basil, oregano, and thyme. The herbal bouquet will give the bombs a Mediterranean twist. The herbs also add a subtle color contrast that looks appetizing on the plate.
Vegan Version
Use a plant‑based mozzarella substitute and vegan butter. The texture will be slightly different, but the flavor profile remains indulgent. Be sure to check that the vegan cheese melts well; some brands don’t melt as smoothly.
Cheddar & Bacon Bombs
Crumbled cooked bacon and shredded sharp cheddar create a smoky, savory bomb that’s a hit with bacon lovers. The bacon fat also adds richness that complements the butter and cheese. Just be careful not to over‑bake; the bacon can crisp out too much.
Sweet Cinnamon Bombs
Sprinkle a pinch of cinnamon on the biscuit before baking. The sweet spice will contrast with the savory cheese and butter, creating a unique flavor profile. This version is a fun way to transition the dish into a brunch item.
Storing and Bringing It Back to Life
Fridge Storage
Cool the bombs completely, then wrap them tightly in plastic wrap and place them in an airtight container. Store in the refrigerator for up to 3 days. When ready to eat, reheat in a 350°F oven for 5–7 minutes, or until the cheese is warm and slightly bubbling.
Freezer Friendly
After cooling, wrap each bomb individually in foil and place them in a freezer bag. They’ll keep for up to 2 months. To thaw, leave them at room temperature for 30 minutes, then reheat as directed. The texture remains crisp on the outside and gooey on the inside.
Best Reheating Method
Reheat in a preheated oven at 350°F for 5–7 minutes. If you’re in a hurry, use a microwave on medium power for 30 seconds, but the texture will be less crisp. Add a tiny splash of water before reheating to create steam that helps the cheese stay moist and silky.