Picture this: I’m standing in my kitchen at midnight, the fridge humming like a lazy cat, and a sudden, insistent craving for something that feels like a brownie but won’t make me feel guilty the next morning. I grabbed a half‑finished jar of oats, tossed in a random dash of cocoa, and—boom—an accidental masterpiece was born. The moment the cocoa dust settled, a rich, chocolatey perfume flooded the room, curling around my nose like a warm blanket, while the creamy yogurt swirled like silk on a summer night. I was half‑laughing, half‑crying, and fully convinced that I had just discovered the holy grail of breakfast‑dessert hybrids.
Fast forward to today, after countless taste‑tests, spilled milk, and a few too‑many midnight snack raids, I’ve refined this chaos into a polished, brag‑worthy recipe that will make you question every boring bowl of oatmeal you’ve ever known. The secret? A perfect marriage of rolled oats, chia seeds, and cocoa powder that creates a texture as smooth as a brownie’s center yet as hearty as a classic oat bowl. The maple syrup adds just enough natural sweetness to coax your taste buds awake, while the Greek yogurt adds that tangy, protein‑packed punch that keeps you full until lunch. And the chocolate chips? They’re the surprise fireworks that pop in your mouth, turning each bite into a tiny celebration.
Most overnight oat recipes try to be “healthy” and end up tasting like cardboard with a hint of vanilla. Most brownie‑inspired breakfasts either drown you in sugar or leave you with a soggy mess that looks like a failed science experiment. This version, however, hits the sweet spot—literally and figuratively—by balancing indulgence with nutrition, and it does so without any baking, frying, or complicated gadgets. I dare you to taste this and not go back for seconds; the combination of cocoa depth and oat heartiness is a game‑changer that will have you bragging to coworkers and family alike.
And here’s the kicker: I’m about to reveal a tiny technique involving a quick “toast‑the‑cocoa” step that most recipes completely overlook. It’s the difference between a flat, bland chocolate flavor and a deep, espresso‑like richness that makes the whole bowl sing. Okay, ready for the game‑changer? Let me walk you through every single step — by the end, you’ll wonder how you ever made it any other way.
What Makes This Version Stand Out
- Flavor: The toasted cocoa powder delivers a deep, almost espresso‑like chocolate note that ordinary cocoa just can’t match.
- Texture: Chia seeds create a subtle crunch that contrasts beautifully with the creamy oat base, mimicking the fudgy bite of a brownie.
- Simplicity: Only nine ingredients, all pantry‑friendly, and no cooking required beyond a quick stovetop toast.
- Uniqueness: The addition of Greek yogurt adds a tang that balances the sweetness, turning a dessert into a balanced breakfast.
- Crowd Reaction: Guests will swear you spent hours in the kitchen, yet the prep is under ten minutes—pure magic.
- Ingredient Quality: Using high‑quality cocoa powder and real maple syrup makes the flavor sing without artificial additives.
- Make‑Ahead Potential: This dish lives happily in the fridge for up to five days, getting better as the flavors meld.
- Versatility: Swap milk for almond, yogurt for coconut, or add a scoop of protein powder—your canvas, your rules.
Inside the Ingredient List
The Flavor Base
Rolled Oats (2 cups): The backbone of the dish, rolled oats soak up the liquid and create that hearty, chewy bite you expect from a classic oatmeal. If you use instant oats, you’ll lose the satisfying texture and end up with a mushy mess. For the best result, choose thick‑cut rolled oats—they hold their shape after soaking. If you’re gluten‑intolerant, certified gluten‑free oats work just as well.
Cocoa Powder (8 tbsp): This is where the “brownie” magic lives. The higher the cocoa content, the richer the flavor, so aim for a Dutch‑processed variety if you can find it. Skipping the toast step will give you a flat chocolate taste, which is why I always recommend that quick heat. If you’re out of cocoa, a tablespoon of unsweetened chocolate melted into the milk works as a backup.
Maple Syrup (4 tbsp): Natural sweetness with a hint of caramel that pairs perfectly with the bitterness of cocoa. Avoid corn syrup or honey if you want that authentic maple depth. If you’re watching sugar, you can halve the amount and add a pinch of stevia, but the texture will be slightly less glossy.
The Texture Crew
Chia Seeds (4 tbsp): Tiny powerhouses that gel the liquid, giving the oats a pudding‑like consistency while adding omega‑3s and fiber. If you don’t have chia, you can substitute with ground flaxseed, though the texture will be a bit less gel‑like. Remember, chia expands up to ten times its size, so don’t over‑mix or you’ll end up with a clumpy mess.
Greek Yogurt (1 cup): The tangy, protein‑rich component that prevents the bowl from feeling overly sweet. It also adds a creamy mouthfeel that mimics the fudgy center of a brownie. If you’re dairy‑free, swap with coconut‑based yogurt, but the tang will be milder, so you may need a splash more lemon juice.
The Unexpected Star
Milk (2 cups): The liquid that brings everything together. Whole milk gives the richest mouthfeel, but any milk—almond, oat, soy—will work. If you’re aiming for a lower‑calorie version, use skim milk, but expect a thinner texture unless you add an extra tablespoon of chia.
Chocolate Chips (4 tbsp): Tiny bursts of melty chocolate that turn each bite into a surprise party. For an extra indulgent twist, use dark chocolate chips with 70% cocoa. If you’re allergic to chocolate, chopped toasted nuts can provide a crunchy alternative.
The Final Flourish
Vanilla Extract (4 tsp): A subtle aromatic that lifts the entire flavor profile, making the chocolate taste deeper and more rounded. Use pure vanilla extract; imitation can taste harsh and overpowers the delicate balance.
Salt (4 pinches): A pinch of salt amplifies the chocolate flavor and balances the sweetness. Don’t skip it—salt is the unsung hero that turns good chocolate into great chocolate.
Everything's prepped? Good. Let's get into the real action...
The Method — Step by Step
Start by toasting the cocoa powder. Heat a dry skillet over low heat, sprinkle the 8 tablespoons of cocoa, and stir constantly for about 30 seconds. You’ll notice a faint, nutty aroma rise—this is the moment the cocoa awakens. Watch out for burning; cocoa can go from toasted to bitter in seconds, so keep the heat low and the stirring steady. Once fragrant, remove from heat and set aside.
While the cocoa cools, combine the rolled oats and chia seeds in a large mixing bowl. Give them a quick toss so the chia is evenly distributed—think of it as a miniature confetti party. This step ensures the chia will gel uniformly, preventing clumps later. I like to use my hands here; the tactile feel tells you the dry ingredients are well‑mixed.
In a separate saucepan, gently warm the milk over medium‑low heat. You don’t want it boiling—just enough to become steamy and ready to mingle with the dry mix. As the milk warms, stir in the toasted cocoa, maple syrup, and vanilla extract. The mixture should turn a deep, velvety brown, and a sweet, caramel‑like scent will fill your kitchen, making you wonder why you ever waited to eat breakfast.
Now, it’s time for the “cream‑fusion” stage. Add the Greek yogurt to the warm cocoa‑milk mixture, whisking vigorously until the blend is smooth and glossy. This is the moment of truth—the yogurt should melt into the liquid without curdling, creating a luxurious texture that coats the oats like velvet. If you notice any lumps, keep whisking; the heat will help dissolve them.
Pour the hot chocolate‑yogurt mixture over the dry oat‑chia blend. Stir gently but thoroughly, making sure every oat grain is submerged. You’ll see the oats start to soften almost instantly, and the chia will begin to swell, creating a pudding‑like consistency. This is where the magic happens—if the mixture looks too thick, add a splash more milk; if too runny, sprinkle a bit more oats.
Fold in the chocolate chips and a pinch of salt. The chips should remain whole, providing pockets of melty goodness once they soften in the fridge. The salt will enhance the chocolate depth, making the flavor pop. Give the bowl one final gentle stir, then cover tightly with plastic wrap or a lid.
Place the bowl in the refrigerator for at least 4 hours, preferably overnight. This resting period lets the chia fully gelatinize and the oats absorb the flavors, turning the mixture into a thick, fudgy delight. Picture yourself pulling this out of the fridge the next morning, the whole kitchen smelling incredible, and the surface glistening with a thin chocolate sheen.
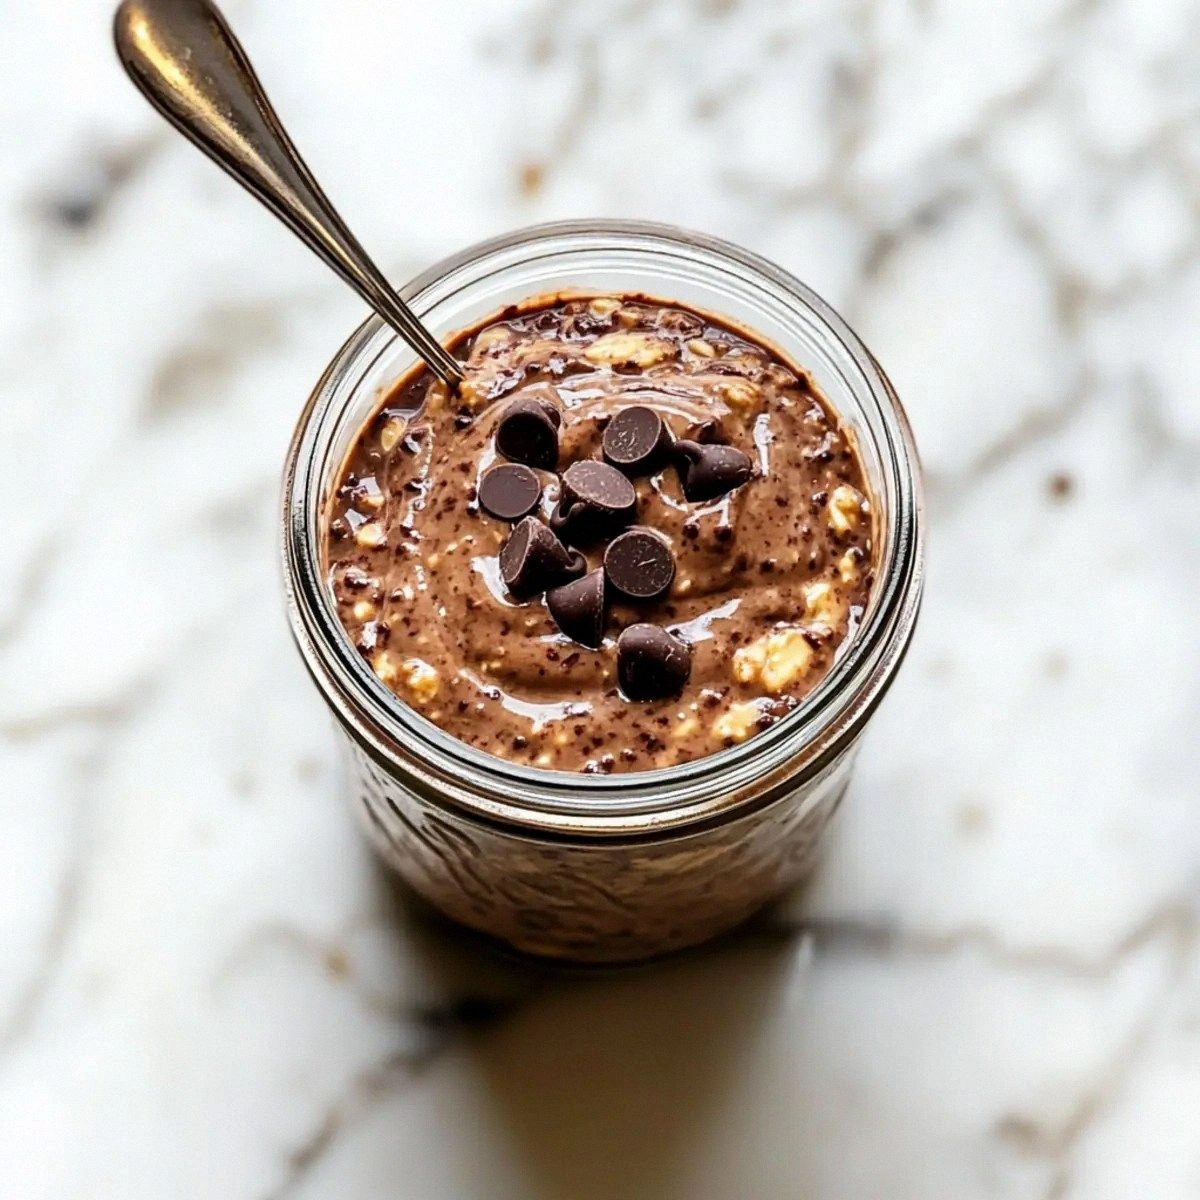
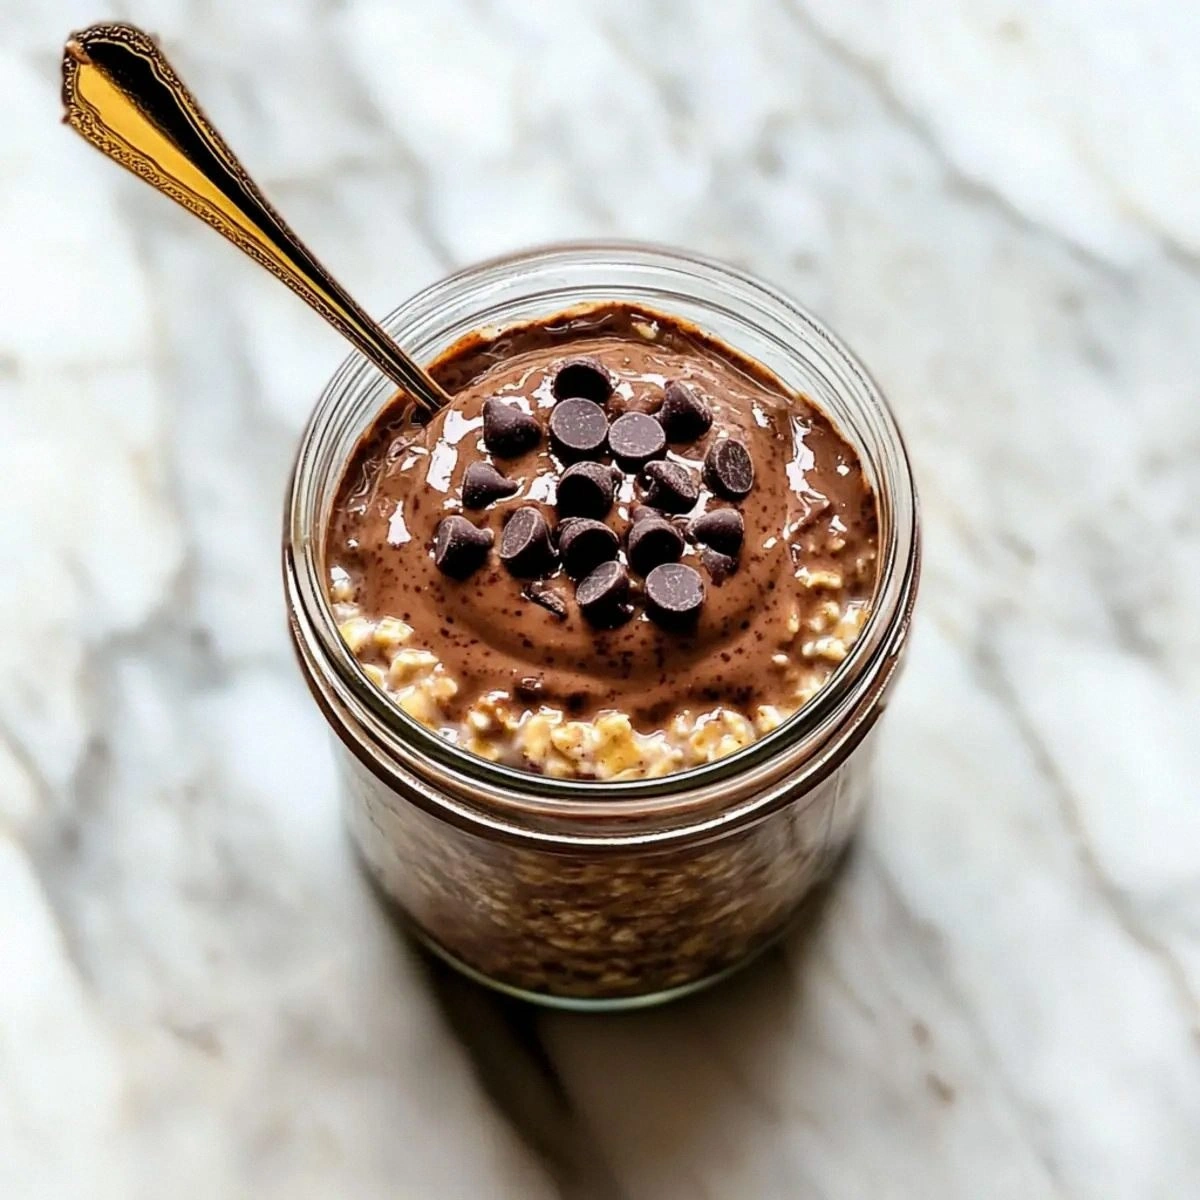
When you’re ready to eat, give the oats a quick stir, then top with any extra toppings you love—extra chocolate chips, sliced bananas, a drizzle of almond butter, or a sprinkle of toasted coconut. The final garnish is your personal signature, and trust me, it’s worth the extra effort. Serve chilled or let sit at room temperature for 10 minutes if you prefer a softer bite.
That's it — you did it. But hold on, I've got a few more tricks that'll take this to another level...
Insider Tricks for Flawless Results
The Temperature Rule Nobody Follows
Never pour boiling milk over the oats; a scorching splash will cook the oats unevenly and create a gritty texture. Instead, aim for a warm‑but‑not‑hot temperature (around 130°F/55°C). This gentle heat activates the chia without shocking the yogurt, preserving that creamy mouthfeel. A friend once tried using boiling water and ended up with a lumpy, almost curdled mess—let’s just say it didn’t win any awards.
Why Your Nose Knows Best
The moment you smell the toasted cocoa is your cue that the flavor is fully developed. If you don’t detect that nutty, slightly bitter aroma, keep stirring a few seconds longer. Your nose is a more reliable flavor gauge than a timer because it senses volatile compounds that indicate depth. Trust it, and you’ll avoid a bland batch that tastes like plain oatmeal with a hint of chocolate.
The 5‑Minute Rest That Changes Everything
After mixing, let the bowl sit uncovered at room temperature for exactly five minutes before refrigerating. This short rest allows the chia to start swelling and the flavors to meld just enough to avoid a “wet” texture. Skipping this step can result in a watery top layer that needs extra stirring later. I’ve tried both ways, and the five‑minute pause is the secret sauce.
Layering for Visual Appeal
For Instagram‑worthy bowls, layer the oats, then a swirl of extra yogurt, and finish with a generous sprinkle of chocolate chips. The visual contrast of dark chocolate against the creamy white yogurt makes the dish look as good as it tastes. This trick also creates a textural gradient—crunch on top, creamy middle, and chewy base.
Protein Boost Without Compromise
If you need an extra protein punch, stir in a scoop of vanilla whey protein after the cocoa‑milk mixture has cooled slightly. The protein powder will dissolve smoothly without clumping, and the vanilla flavor complements the cocoa perfectly. Just remember to reduce the maple syrup a bit, as protein powders can add sweetness.
Creative Twists and Variations
This recipe is a playground. Here are some of my favorite ways to switch things up:
Mocha Madness
Swap half the milk for strong brewed coffee and add a teaspoon of instant espresso powder. The result is a caffeine‑kissed breakfast that feels like a coffee shop treat. Perfect for those mornings when you need a double‑shot of motivation.
Nutty Brownie Crunch
Replace chocolate chips with toasted chopped almonds or hazelnuts. The nuts add a buttery crunch that mimics the texture of a brownie’s crust, while also boosting healthy fats. This variation is a hit with anyone who loves a bit of crunch in every bite.
White Chocolate Dream
Use white chocolate chips instead of dark, and add a pinch of orange zest. The citrus brightens the rich creaminess, creating a flavor reminiscent of a holiday dessert. It’s a subtle twist that feels indulgent without being overpowering.
Vegan Velvet
Swap Greek yogurt for coconut‑based yogurt and use maple syrup as the sweetener. The coconut yogurt adds a tropical note, and the dish remains dairy‑free while keeping that luscious texture. I’ve found that a dash of lemon juice helps balance the coconut’s natural sweetness.
Berry Bliss
Stir in a handful of fresh or frozen berries (blueberries, raspberries) before refrigerating. The berries burst with juicy acidity, cutting through the chocolate richness and adding antioxidants. This version is perfect for summer mornings when berries are at their peak.
Storing and Bringing It Back to Life
Fridge Storage
Transfer the finished oats into airtight glass jars or containers. They’ll keep fresh for up to five days, and the flavors will continue to deepen. When you’re ready to eat, simply give the jar a good shake or stir, and enjoy straight from the fridge or at room temperature.
Freezer Friendly
If you want to make a big batch, portion the oats into single‑serve freezer bags. Freeze for up to three months. To reheat, thaw overnight in the fridge, then add a splash of milk and stir. The added liquid revives the creamy texture, making it taste freshly made.
Best Reheating Method
Microwave for 30‑45 seconds, stirring halfway through. For a stovetop method, gently warm in a saucepan over low heat, adding a teaspoon of water or milk to steam it back to perfection. The steam restores the silky mouthfeel that can sometimes dry out after refrigeration.