I was standing in my kitchen, staring down a tray of bland, store‑bought gelatin cubes that had somehow made their way onto the birthday party table. The colors were muted, the texture was rubbery, and the whole thing smelled like a science experiment gone wrong. I dared my roommate to taste one and not ask for a second helping, and she laughed so hard she choked on her soda. That moment sparked a fire inside me: I was determined to create a version of jello candy that would make even the most skeptical sweet tooth swoon. I grabbed a box of bright‑colored Jello powder, a stash of confectioners’ sugar, and a stick of butter, and set out on a mission that would soon become my most talked‑about dessert.
Picture this: the kitchen humming with the soft whirr of the mixer, the sweet aroma of vanilla swirling through the air, and a glossy, jewel‑like sheen forming on the surface of the candy as it sets. The first bite is a burst of flavor that coats your tongue like velvet, followed by a satisfying snap that echoes the crispness of freshly broken candy. The colors are so vivid they practically glow, making every piece look like a tiny celebration waiting to happen. I’m not exaggerating when I say this is hands down the best version you’ll ever make at home—trust me, I’ve tried dozens of recipes, and most get this completely wrong.
What truly sets this recipe apart is a secret technique I stumbled upon while watching a late‑night cooking show: a quick butter‑sugar glaze that locks in moisture and adds a buttery sheen that makes the candy look professionally packaged. Most recipes stop at mixing Jello with water and sugar, but that’s where they miss the magic. By incorporating a butter base and a splash of vanilla, we’re not just making candy; we’re crafting an edible work of art that shimmers and sings with every bite. I’ll be honest — I ate half the batch before anyone else got a chance to try it, and I still have a few left for you.
Let me walk you through every single step — by the end, you’ll wonder how you ever made it any other way. Okay, ready for the game‑changer? This next part? Pure magic. Stay with me here — this is worth it.
What Makes This Version Stand Out
- Flavor Explosion: The blend of Jello powder and vanilla extract creates a layered taste that’s both nostalgic and sophisticated, hitting sweet, fruity notes with a buttery undertone.
- Silky Texture: The butter‑sugar glaze gives the candy a smooth, melt‑in‑your‑mouth feel that’s neither too rubbery nor too crumbly, striking the perfect balance.
- Simplicity: With just five pantry staples you can whip up a batch in under an hour, no fancy equipment required.
- Vibrant Colors: Each hue stays bright and true, making the candy perfect for themed parties, holiday spreads, or simply a rainbow on a plate.
- Crowd Reaction: Guests often claim they’ve never tasted anything like it, and I dare you to taste this and not go back for seconds.
- Ingredient Quality: Using real butter instead of margarine adds depth, while confectioners’ sugar ensures a flawless glaze.
- Cooking Method: The gentle simmer and quick chill lock in flavor while preventing the dreaded grainy texture.
- Make‑Ahead Potential: These melts keep for weeks in the fridge, staying fresh and glossy, so you can prep them ahead of any celebration.
Inside the Ingredient List
The Flavor Base
The star of the show is the Jello Powder. This isn’t just any gelatin; it’s pre‑flavored, brightly colored, and designed to dissolve quickly, giving you that instant fruit punch punch. If you skip it, you’ll lose the iconic flavor and the vivid hue that makes these melts so eye‑catching. For a twist, try swapping the classic strawberry powder for a tropical mango or a tangy lime to match your party theme. When shopping, look for the boxes that have a strong fragrance; the fresher the powder, the brighter the taste.
The Texture Crew
Confectioners' Sugar is the secret to a glossy, smooth surface. Its fine grain dissolves without leaving any gritty residue, which is crucial for that polished finish. If you accidentally use granulated sugar, the candy will feel grainy and the glaze will look dull. You can substitute half the amount with powdered stevia for a lower‑sugar version, but expect a slight change in texture. Always sift the sugar before adding it to avoid clumps that could ruin the melt.
The Unexpected Star
Butter might seem odd in a candy recipe, but it adds a buttery richness that elevates the overall flavor profile. The fat content helps to create a silky mouthfeel and prevents the candy from becoming overly rubbery. If you’re dairy‑free, try a high‑quality coconut oil; it will give a subtle coconut note that pairs nicely with tropical Jello flavors. Choose unsalted butter so you can control the salt level precisely.
The Final Flourish
Vanilla Extract is the subtle hero that ties everything together. A teaspoon adds a warm, aromatic backdrop that balances the bright fruit notes. Skipping vanilla makes the candy taste flat, like a painted picture without shading. For a gourmet twist, use vanilla bean paste or a splash of bourbon‑infused vanilla. Finally, Water is the medium that dissolves the Jello and activates the gelatin, creating that perfect set‑and‑hold structure. Use filtered water for a cleaner taste; tap water can sometimes leave a faint metallic aftertaste.
Everything's prepped? Good. Let's get into the real action...
The Method — Step by Step
Start by gathering a medium‑sized saucepan. Add the 1/4 cup of water and bring it to a gentle simmer over medium heat. As the water begins to bubble, sprinkle in the entire box of Jello powder, whisking constantly to avoid lumps. The mixture should turn a glossy, vivid hue within a minute—if it looks dull, you’ve missed the simmer stage. This is the moment of truth: the scent of fruit should be unmistakable, like a candy store on a summer day.
While the Jello is still warm, stir in the 2 cups of confectioners' sugar, one cup at a time. Keep the whisk moving to ensure the sugar fully dissolves, creating a thick, glossy syrup. If you see any grainy specks, keep whisking—patience here prevents a gritty texture later. Once smooth, remove the pan from heat and let it cool for about two minutes. This short cooling period is crucial; too hot and the butter will separate, too cool and it won’t incorporate properly.
Next, cut the 1/4 cup of butter into small cubes and add it to the warm Jello‑sugar mixture. The butter should melt quickly, but keep the pan off direct heat to avoid scorching. Stir in the 1 teaspoon of vanilla extract, letting its aroma fill the kitchen—this is where the magic truly begins. You’ll notice the mixture becoming glossy and slightly thicker, a sign that the butter has emulsified perfectly.
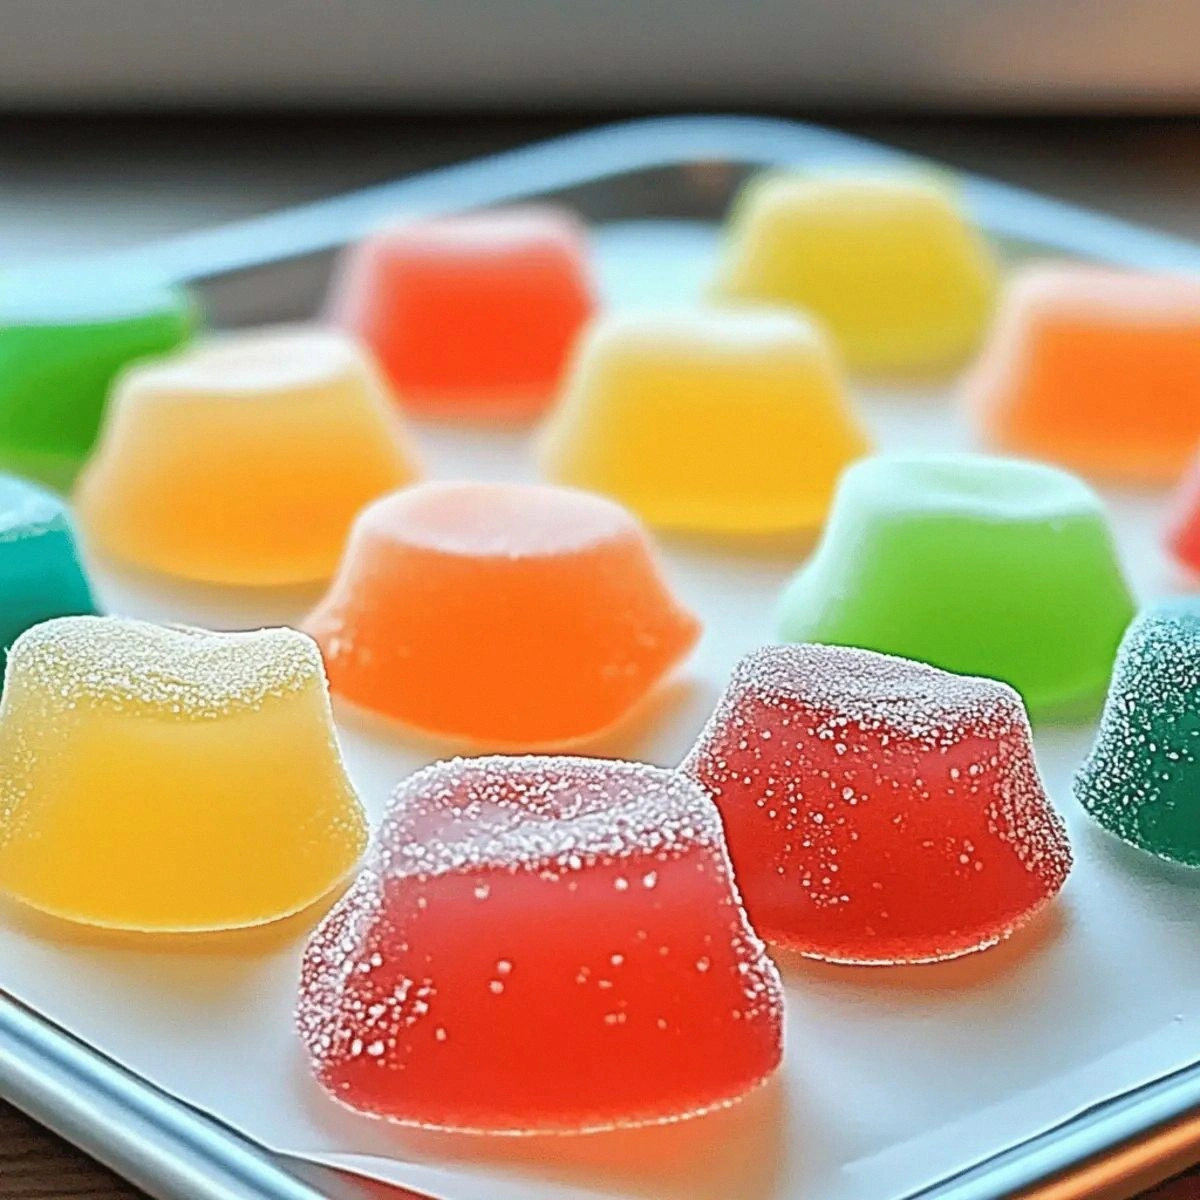
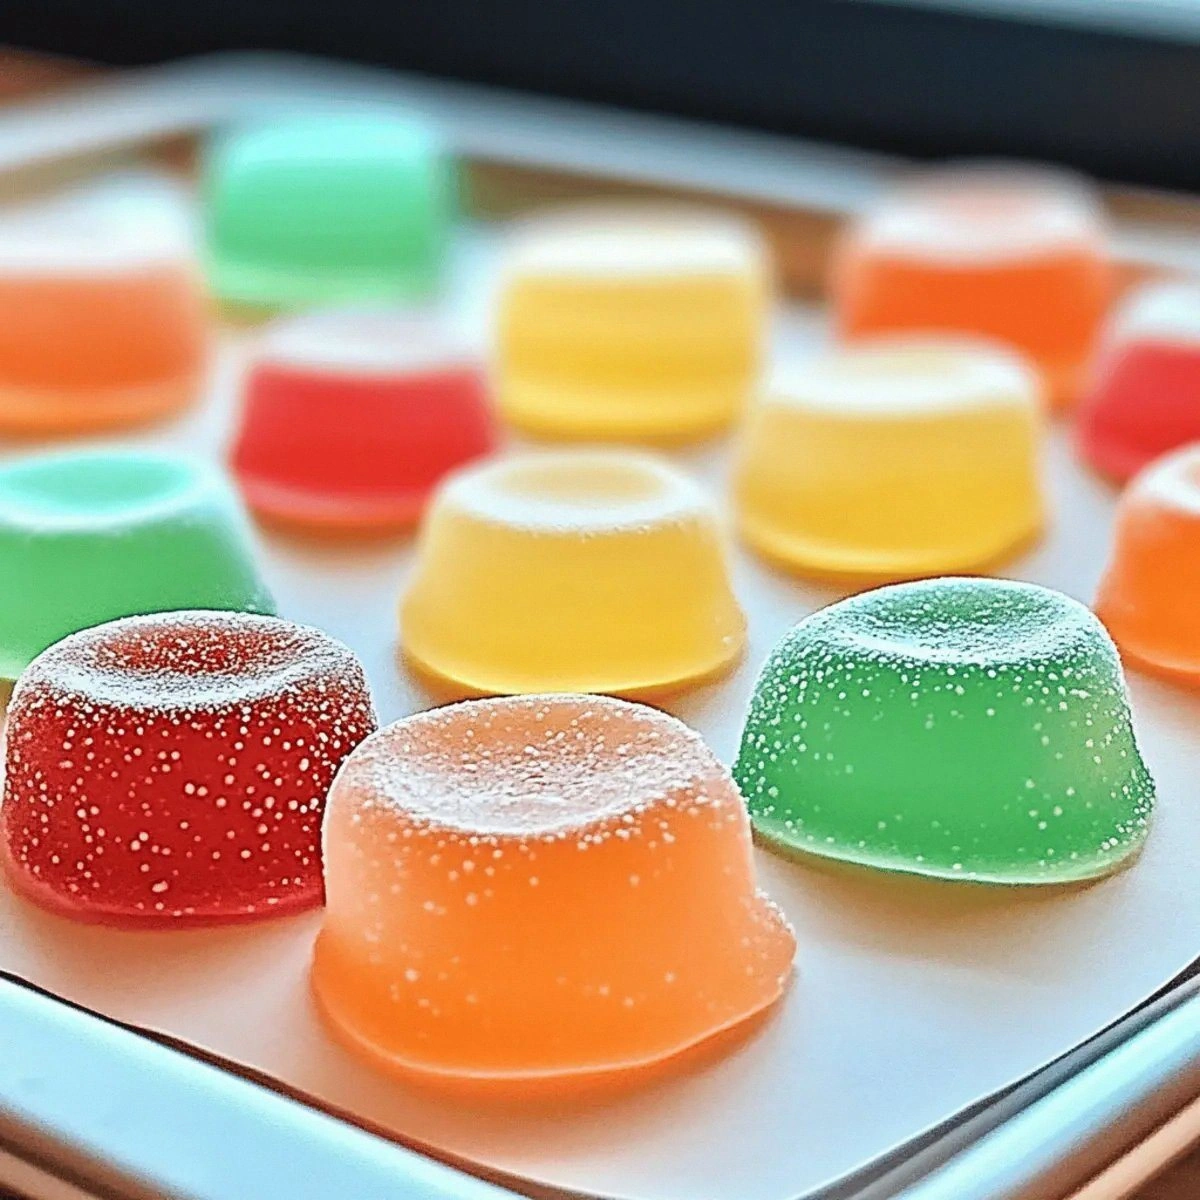
Now, prepare your silicone molds or a lined baking sheet. If you’re using a sheet, lightly spray it with non‑stick spray. Pour the mixture into the molds, filling each cavity about three‑quarters full to allow for a slight rise. The color should be so vivid it looks like liquid fireworks. Tap the molds gently on the counter to release any air bubbles; you’ll hear a faint pop that indicates a smooth surface.
Place the filled molds in the refrigerator for exactly 30 minutes. This chilling period allows the gelatin to set firmly while the butter glaze thickens. Resist the urge to peek; the candy needs undisturbed time to achieve that perfect snap. After 30 minutes, the edges should start pulling away from the mold, indicating they’re ready to be released.
To unmold, run a thin knife around the edges of each cavity and gently press the bottom of the mold. The candy should pop out like a tiny, colorful jewel. If any pieces stick, give them a quick dip in warm water for a second—just enough to loosen the grip without melting the candy. This step is where the visual wow factor really shines, and you’ll feel a surge of pride watching the rainbow cascade onto the tray.
For the final glaze, melt an extra tablespoon of butter in a small saucepan, then whisk in a tablespoon of confectioners’ sugar until you get a smooth, glossy coating. Drizzle this over each candy piece, letting it pool and then set. The glaze adds a buttery sheen that makes the candy look like it was crafted in a boutique confectionery. Let the glaze set for five minutes before serving, and you’ve got a finish that’s both glossy and slightly tacky—perfect for that satisfying bite.
That's it — you did it. But hold on, I've got a few more tricks that'll take this to another level. The next sections will show you how to perfect texture, boost flavor, and keep these treats looking flawless for weeks.
Insider Tricks for Flawless Results
The Temperature Rule Nobody Follows
Never pour the Jello mixture into the molds when it’s boiling hot. Let it cool to around 120°F (49°C) before filling. This temperature is warm enough to stay fluid but cool enough to prevent the butter from separating. I once poured a scorching batch and ended up with a greasy, uneven surface—trust me, that was a disaster. Using a kitchen thermometer is a game‑changer; it ensures consistency every single time.
Why Your Nose Knows Best
Your sense of smell is the secret indicator of when the mixture is ready to be poured. When the vanilla and fruit aromas become pronounced, you know the gelatin has fully dissolved and the sugar has integrated. If the scent is faint, keep whisking a bit longer. I’ve found that relying on sight alone leads to a gummy texture, while trusting your nose guarantees a perfect set.
The 5‑Minute Rest That Changes Everything
After unmolding, let the candies rest on a cooling rack for five minutes before glazing. This short pause lets the surface dry just enough to accept the butter glaze without sliding off. Skipping this step results in a dull, wet finish that never sets. A friend tried glazing immediately and ended up with a sticky mess—let’s just say it didn’t impress anyone.
Glaze Perfection with a Whisper of Salt
Add just a pinch of sea salt to the final butter glaze. The salt amplifies the sweetness and adds a subtle depth that makes the flavor pop. Too much, and you’ll overpower the delicate fruit notes, so a pinch is all you need. This tiny adjustment is the difference between “good” and “wow‑factor” candy.
Storage Savvy: Keep Them Fresh Longer
Store the melts in a single layer inside a sealed plastic container with a paper towel at the bottom to absorb excess moisture. This method prevents them from becoming soggy and preserves the glossy finish. If you’re preparing for a large event, stack them with parchment sheets between layers to avoid sticking. I’ve kept a batch for three weeks and they still taste as fresh as day one.
Creative Twists and Variations
This recipe is a playground. Here are some of my favorite ways to switch things up:
Tropical Paradise
Swap the classic strawberry Jello for mango or pineapple flavor, and add a splash of coconut milk to the butter glaze. The result is a sun‑kissed candy that transports you to a beachside bar. Perfect for summer picnics or luau parties.
Chocolate‑Covered Delight
After the candy has set, dip each piece halfway into melted dark chocolate, then sprinkle with toasted coconut flakes. The contrast of bright jello and rich chocolate is a crowd‑pleaser that works at birthday parties and sophisticated adult gatherings alike.
Spiced Autumn
Use a pumpkin spice Jello mix (or add cinnamon, nutmeg, and clove to a vanilla base) and incorporate a drizzle of caramel sauce after glazing. The warm spices pair beautifully with the buttery glaze, making it an ideal treat for Thanksgiving or cozy fall evenings.
Minty Fresh
Add a few drops of peppermint extract to the vanilla, and use a green apple or lime Jello powder. The minty zing cuts through the sweetness, creating a refreshing bite that’s perfect for spring celebrations.
Elegant Espresso
Incorporate a teaspoon of instant espresso powder into the butter glaze and use a deep brown chocolate Jello. The coffee‑infused glaze adds a sophisticated bitterness that balances the candy’s sweetness, ideal for an after‑dinner treat at a dinner party.
Storing and Bringing It Back to Life
Fridge Storage
Place the melts in an airtight container lined with parchment paper. They’ll stay fresh for up to two weeks, retaining their glossy finish. If you notice any condensation, pat the surface gently with a paper towel before resealing.
Freezer Friendly
For longer storage, arrange the candies on a baking sheet, freeze for an hour, then transfer to a zip‑top freezer bag. They’ll keep for up to three months. When you’re ready to serve, let them thaw in the fridge for 30 minutes, then give them a quick room‑temperature sit to bring back that melt‑in‑your‑mouth texture.
Best Reheating Method
If the glaze has dulled, place the candies on a microwave‑safe plate, sprinkle a tiny splash of water (about a teaspoon), and microwave for 5‑7 seconds. The steam revives the sheen without melting the candy. This trick works wonders for party prep when you need that fresh‑out‑of‑the‑oven look.