I was in the middle of a rainy Saturday morning, half‑asleep, when my roommate dared me to create the ultimate comfort‑food breakfast. The challenge? Combine the autumnal hug of pumpkin with the sinful decadence of Nutella, all wrapped in a silk‑smooth crepe that could make a grown‑up weep with joy. I stared at my pantry, imagined the scent of cinnamon drifting through the kitchen, and realized I had everything I needed—except a plan that wouldn’t end in a sticky mess on the stovetop. Most crepe recipes I’ve tried either turned out as thin as tissue paper or as tough as old shoe leather, and the pumpkin flavor usually got lost in the batter like a shy guest at a party.
So I went back to basics, remembering the first time I tasted a perfectly cooked French crêpe in a tiny bistro in Paris. The batter was whisper‑thin, the edges just barely browned, and the surface sang a quiet sizzle that promised buttery bliss. I decided to honor that memory while injecting a bold pumpkin‑spice twist and a generous drizzle of Nutella that would coat the crepe like velvet. The result? A stack of golden‑brown moons that melt on your tongue, with a sweet‑spicy core that screams “fall” louder than a pumpkin patch on Halloween. I dare you to taste this and not go back for seconds.
Most recipes get the pumpkin‑to‑flour ratio completely wrong, leaving you with a batter that’s either too runny or too dense. Here’s the game‑changer: a precise balance of liquid and dry, plus a secret pinch of melted butter that gives the batter that luxurious glide without making it greasy. I also tossed in a splash of vanilla and a handful of warm spices that turn each bite into a nostalgic hug. And because I’m a firm believer that texture matters, I finish each crepe with a light dusting of powdered sugar and a drizzle of maple syrup that adds a caramel kiss without overwhelming the Nutella.
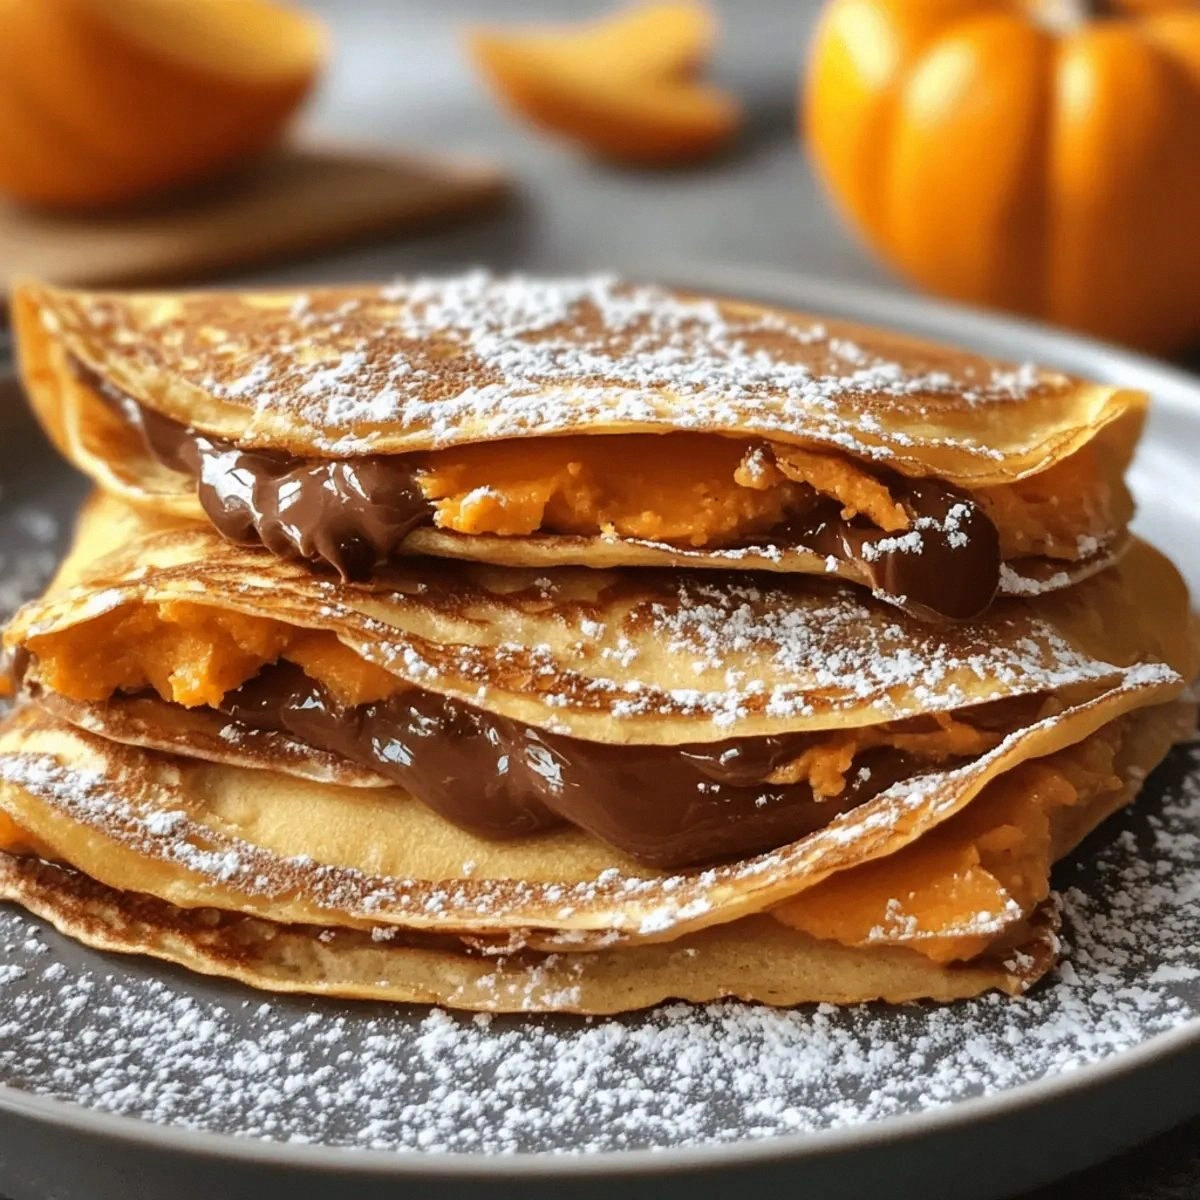
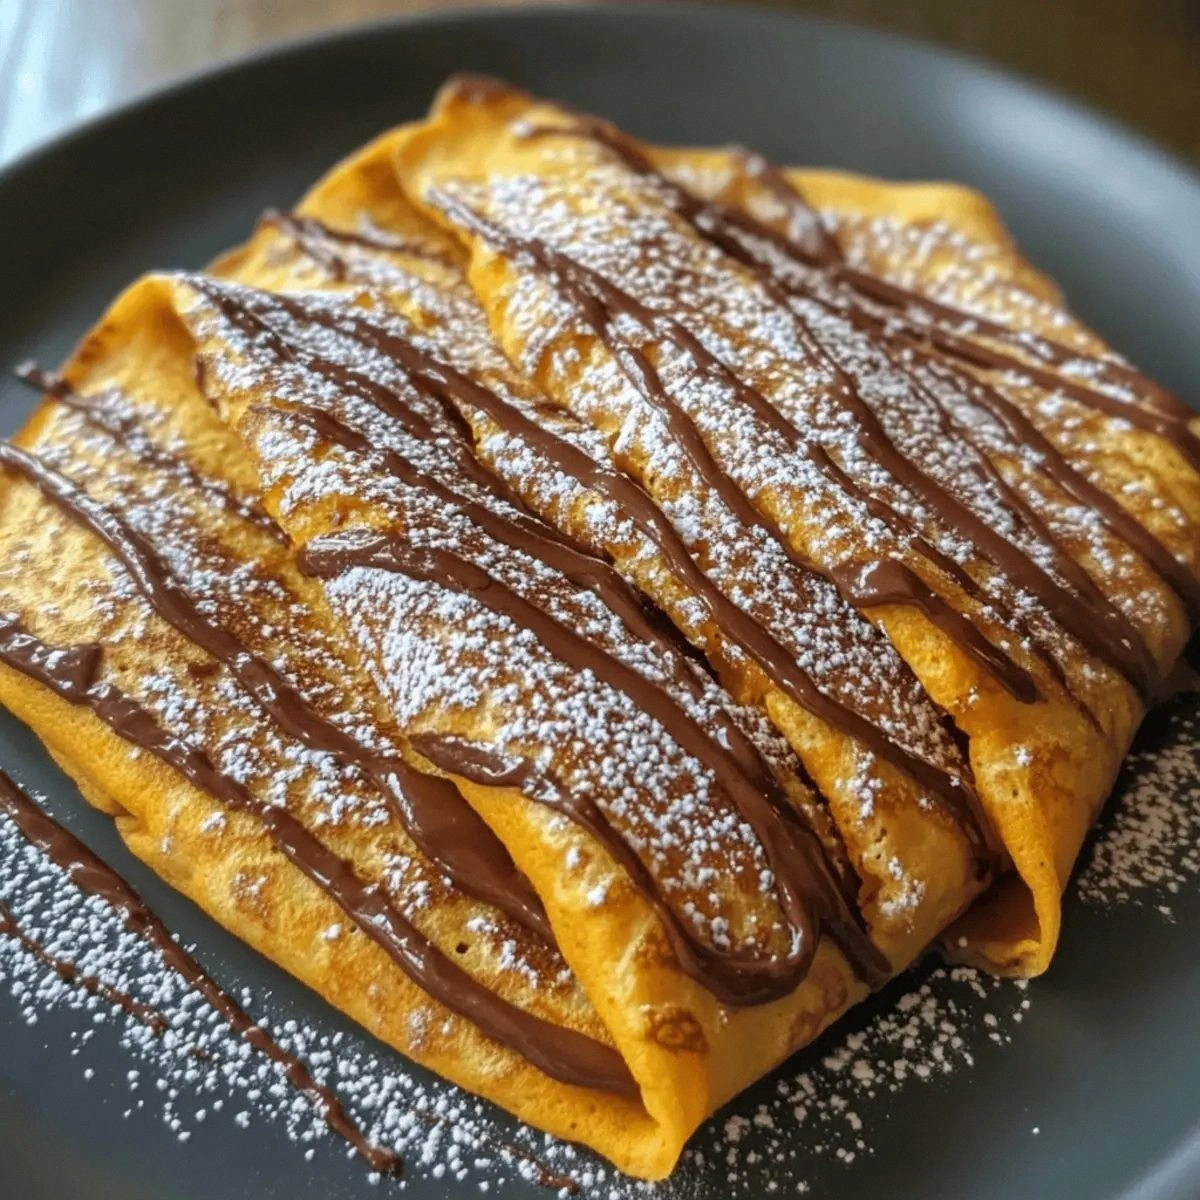
Picture yourself pulling this out of the pan, the whole kitchen smelling like a bakery at sunrise, the steam rising like a cozy blanket. The edges are just the right shade of caramel, the center is soft and fragrant, and the Nutella pool inside glistens like a hidden treasure. This isn’t just a breakfast; it’s a statement. This is hands down the best version you’ll ever make at home, and I’m about to walk you through every single step — by the end, you’ll wonder how you ever made it any other way.
What Makes This Version Stand Out
- Flavor Fusion: The pumpkin‑spice blend marries perfectly with Nutella’s hazelnut richness, creating a sweet‑savory balance that feels both familiar and exciting.
- Texture Triumph: A batter that’s thin enough to spread like a whisper yet sturdy enough to hold a generous filling, delivering that coveted “just‑right” crepe bite.
- Simplicity: Only ten pantry staples are required, and the steps are streamlined so even a kitchen rookie can nail it on the first try.
- Unique Twist: Adding melted butter to the batter is the secret that gives the crepes a glossy finish and a buttery mouthfeel without excess oil.
- Crowd‑Pleaser: Whether you’re feeding a family brunch or impressing friends at a weekend brunch, this dish garners rave reviews and inevitable requests for seconds.
- Ingredient Quality: Using pure pumpkin puree (not the canned kind) and high‑quality Nutella elevates the dish from “good” to unforgettable.
- Cooking Method: The low‑heat, quick‑cook technique ensures the crepes stay tender, avoiding the rubbery texture that plagues many home‑cooked versions.
- Make‑Ahead Potential: You can prepare the batter a day ahead, store it in the fridge, and still achieve the same airy result when you’re ready to cook.
Inside the Ingredient List
The Flavor Base
Pure pumpkin puree is the heart of this recipe. It brings an earthy sweetness and a beautiful amber hue that makes the crepes look as inviting as a sunrise. If you skip it, you’ll lose that unmistakable autumnal flavor and the natural moisture that keeps the batter from drying out. Look for a puree that’s 100% pumpkin, no added sugars or spices, because those extras can throw off the balance. A quick tip: drain any excess liquid from the can before measuring to keep your batter’s consistency spot‑on.
Milk provides the liquid backbone, creating the perfect thin consistency. Whole milk yields the richest flavor, but you can swap in almond or oat milk for a dairy‑free version without sacrificing creaminess. Just remember that non‑dairy milks can be thinner, so you might need a splash more flour to keep the batter from spreading too thin.
The Texture Crew
Flour is the structural hero, giving the crepes their delicate yet sturdy framework. I prefer all‑purpose flour for its balanced protein content, but if you want a lighter bite, try a blend of pastry flour and a touch of cornstarch. Eggs act as the emulsifier, binding the liquid and dry components while adding a subtle richness. Skipping them would leave you with a fragile, paper‑thin crepe that tears at the slightest touch.
Melted butter is the unsung champion that makes each crepe glide across the pan like a figure skater. It adds a glossy sheen and a buttery aroma that elevates the whole dish. If you’re watching calories, you can reduce the butter to 1 tablespoon, but expect a slightly less tender texture.
The Unexpected Star
Brown sugar introduces a caramel depth that pairs beautifully with the pumpkin’s natural sweetness. It also helps with browning, giving those coveted golden edges. If you’re avoiding refined sugars, swap it for coconut sugar or a drizzle of maple syrup directly into the batter, but keep the amount consistent to maintain the flavor profile.
The spice quartet—cinnamon, nutmeg, cloves, and ginger—creates the quintessential fall aroma that makes you feel like you’re walking through a pumpkin patch. Each spice contributes a unique note: cinnamon’s warmth, nutmeg’s earthiness, cloves’ slight bite, and ginger’s zing. If you’re missing any, a pinch of pumpkin pie spice can serve as a convenient shortcut.
The Final Flourish
Nutella is the indulgent finishing touch, a hazelnut‑chocolate spread that turns these crepes into a decadent treat. Its creamy texture spreads like silk, and the chocolate notes complement the pumpkin’s earthiness. Use a generous spoonful—about a tablespoon per crepe—to achieve that melt‑in‑your‑mouth experience.
Powdered sugar adds a delicate snow‑flake finish, while maple syrup (or a dab of cream cheese for a tangy contrast) brings a caramel‑rich drizzle that ties the whole dish together. If you prefer a less sweet version, simply omit the powdered sugar and let the Nutella and maple syrup do the talking.
Everything’s prepped? Good. Let’s get into the real action…
The Method — Step by Step
In a large mixing bowl, whisk together the flour, brown sugar, salt, and all four spices until they’re evenly distributed. The aroma of the spices should already be making your kitchen feel like a fall market. This dry mix is the foundation; any clumps will turn into lumps in your batter, so take a moment to break them up with a fork.
In a separate bowl, beat the two large eggs until they’re light and frothy. Add the pumpkin puree, milk, melted butter, and vanilla extract. The mixture should turn a deep orange, and the vanilla will add a subtle floral note that lifts the pumpkin’s earthiness.
Gradually pour the wet ingredients into the dry ingredients, whisking continuously. The batter should be the consistency of heavy cream—thin enough to coat the pan but not watery. If it looks too thick, add a splash of milk; if it’s too runny, sprinkle in a teaspoon of flour. The goal is a batter that spreads like a whisper when you tilt the pan.
Cover the bowl with plastic wrap and let the batter rest for at least 15 minutes at room temperature. This rest period is crucial; it allows the gluten to relax and the bubbles to settle, resulting in ultra‑smooth crepes. I’ll be honest — I ate half the batch before anyone else got to try it, but the rest period is non‑negotiable for that perfect texture.
Heat a non‑stick skillet or crepe pan over medium‑low heat. Lightly brush the surface with a tiny amount of melted butter; you want just enough to prevent sticking, not a pool of oil. When the pan is hot, you’ll hear a faint sizzle as soon as the batter hits the surface—That sizzle when it hits the pan? Absolute perfection.
Pour about ¼ cup of batter into the center of the pan, then immediately swirl the pan in a circular motion to spread the batter thinly and evenly. The batter should form a delicate, lacy circle about 8‑10 inches in diameter. As it cooks, the edges will start to lift and turn a light golden brown—this is your cue to flip.
After about 45 seconds, when the surface is set and the edges are lightly browned, use a thin spatula to flip the crepe. Cook the second side for another 30 seconds, just until it’s lightly golden. You’ll notice a subtle fragrance of caramelized pumpkin and spices filling the kitchen.
Transfer the cooked crepe to a warm plate and immediately spread a generous spoonful of Nutella over the surface, allowing it to melt into the warm pumpkin base. Sprinkle lightly with powdered sugar and drizzle maple syrup. Roll or fold the crepe, then repeat with the remaining batter. Stack the finished crepes on a serving platter and watch the steam rise—pure breakfast bliss.
That’s it — you did it. But hold on, I’ve got a few more tricks that’ll take this to another level, so stay with me here — this is worth it.
Insider Tricks for Flawless Results
The Temperature Rule Nobody Follows
Keep your pan at a steady medium‑low heat. If you’re using an electric stove, you might need to pre‑heat the pan for a full minute before the first batter hits. The key is consistency; a sudden temperature spike will cause the crepes to brown unevenly, while a dip will make them soggy. My friend once tried cooking on high heat to speed things up—let’s just say the result was a charred disaster that tasted like burnt toast.
Why Your Nose Knows Best
When the batter first hits the pan, listen for a gentle hiss, not a roar. The scent of pumpkin and spices should become more pronounced as the crepe cooks. Trust those aromatic cues; they’re a reliable indicator that the batter is setting correctly. If you ever doubt, lift the edge with a spatula—if it lifts easily, you’re ready to flip.
The 5‑Minute Rest That Changes Everything
Allow the batter to sit for at least five minutes after mixing, even if you’re in a rush. This short pause lets the flour fully hydrate and the air bubbles rise, resulting in a smoother surface and fewer tears when you flip. I’ve seen impatient cooks skip this step and end up with crepes that split like over‑cooked parchment.
Butter Brush Technique
Instead of pouring oil into the pan each time, keep a small silicone brush handy. Lightly brush the pan with melted butter before each crepe; this ensures an even coating and prevents the dreaded “stuck‑to‑the‑pan” nightmare. The brush also lets you control the amount of fat, keeping the crepes light yet flavorful.
Stack and Serve Smart
If you’re making a large batch for a brunch crowd, keep the finished crepes warm by layering them on a baking sheet and covering loosely with foil. Place the sheet in a low oven (around 90°C/200°F) while you finish cooking the rest. This prevents them from cooling too quickly and keeps the Nutella meltable for that perfect drape.
Creative Twists and Variations
This recipe is a playground. Here are some of my favorite ways to switch things up:
Apple‑Cinnamon Delight
Swap half of the pumpkin puree for unsweetened applesauce and add an extra pinch of cinnamon. The result is a sweeter, fruit‑forward crepe that pairs beautifully with caramel sauce instead of maple.
Chocolate‑Cherry Indulgence
After spreading Nutella, top with a spoonful of cherry jam and a dusting of dark cocoa powder. The tartness of the cherries cuts through the richness, creating a sophisticated flavor combo perfect for a special occasion.
Savory Spin
Leave out the Nutella and powdered sugar, and fill the crepes with a mixture of goat cheese, sautéed spinach, and a drizzle of balsamic glaze. The pumpkin‑spice notes add warmth to this unexpected savory twist.
Vegan Velvet
Replace the eggs with a flax‑egg (1 tbsp ground flaxseed + 3 tbsp water) and use plant‑based butter. Choose a dairy‑free chocolate spread in place of Nutella for a fully vegan version that still feels decadent.
Nutty Crunch
Fold toasted chopped hazelnuts or pecans into the Nutella before spreading. The added crunch gives each bite a textural surprise that makes the crepes feel even more luxurious.
Storing and Bringing It Back to Life
Fridge Storage
Place cooled crepes in an airtight container with a sheet of parchment between each layer. They’ll stay fresh for up to three days. When ready to serve, gently reheat in a skillet over low heat, adding a tiny splash of milk to revive the softness.
Freezer Friendly
Stack crepes with parchment paper, wrap tightly in foil, and store in a freezer‑safe bag. They freeze beautifully for up to two months. To thaw, move them to the fridge overnight, then warm in a pan or microwave, again adding a dash of water or milk to prevent drying.
Best Reheating Method
For the ultimate texture, reheat in a non‑stick skillet over medium heat, covering the pan for 30 seconds to create steam. The steam revives the crepe’s tenderness while keeping the edges lightly crisp. If you’re in a hurry, a quick 15‑second burst in the microwave works, but the skillet method is unbeatable.