Picture this: it’s a frosty December evening, the wind is howling outside, and you’re standing in a kitchen that smells like a Christmas market, with cinnamon and toasted nuts dancing in the air. I was in the middle of a holiday bake‑off with my sister when our classic pumpkin pie collapsed into a soggy mess—yes, that catastrophic moment that made me swear off desserts forever. But then I remembered a half‑finished meringue I’d made weeks ago, and a wild idea sparked: what if I turned that brittle cloud into a show‑stopping trifle? I dared myself to combine the airy crunch of Pavlova with the luxurious layers of a holiday trifle, and the result was nothing short of a festive miracle.
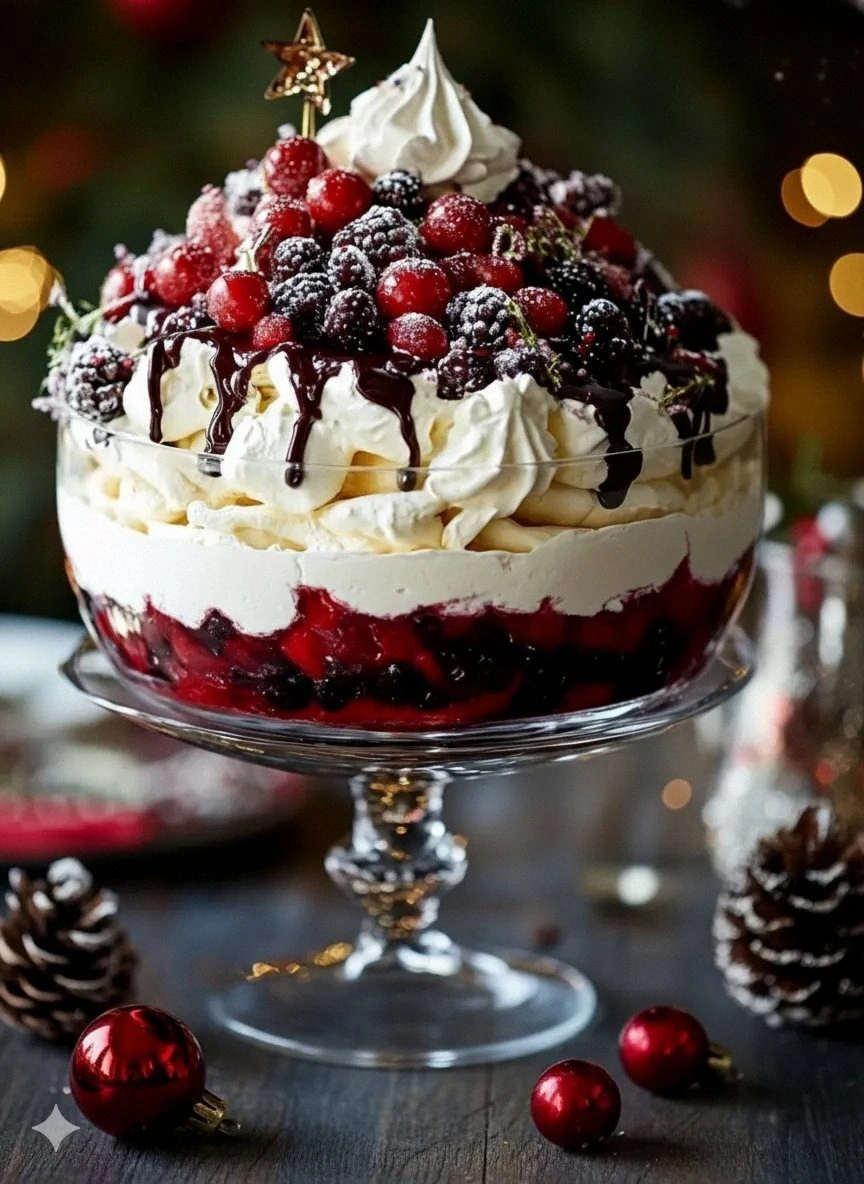
The first bite was a revelation. The crisp, caramelized edges of the meringue sang a sweet, buttery lullaby, while the soft, marshmallow‑like interior melted like fresh snow on a warm tongue. Nestled between those textures were clouds of lightly sweetened whipped cream, speckled with vanilla beans, and a riot of ruby‑red strawberries, deep‑purple raspberries, and midnight‑blue blueberries that burst with tartness. The whole thing was crowned with a drizzle of glossy berry coulis that shone like a Christmas ornament under the kitchen lights. That moment, I thought, “I dare you to taste this and not go back for seconds.”
Most pavlova‑in‑a‑trifle attempts fall flat—either the meringue gets soggy, or the berries turn mushy, or the whole thing ends up looking like a sad, soggy cake. This version, however, flips the script. I’ve cracked the code on keeping the meringue crisp for hours, coaxing the cream into a stable, glossy finish, and layering the berries just right so they stay vibrant and juicy. The secret? A dash of cornstarch in the meringue, a whisper of white vinegar, and a quick‑freeze trick that locks in that perfect crunch. Trust me, this is hands down the best version you’ll ever make at home.
Now, let’s walk through every single step—by the end, you’ll wonder how you ever made a pavlova trifle any other way. Okay, ready for the game‑changer? This next part? Pure magic.
What Makes This Version Stand Out
- Texture: The meringue stays crisp on the outside while staying marshmallow‑soft inside, creating a contrast that’s as satisfying as biting into a snow‑crusted pinecone.
- Flavor: A balanced sweet‑tart symphony from fresh berries, vanilla‑kissed cream, and a subtle hint of citrus that lifts the whole dessert.
- Simplicity: Only seven core ingredients, yet the result feels like a multi‑layered masterpiece you’d order at a five‑star restaurant.
- Uniqueness: Combining the iconic Pavlova with a trifle structure is a holiday twist you won’t find in any traditional recipe book.
- Crowd Reaction: Guests gasp, stare, and then line up for seconds—yes, I’ve seen grown adults fight over the last spoonful.
- Ingredient Quality: Using fresh, organic berries and free‑range eggs makes every bite sing with natural sweetness.
- Cooking Method: Low‑heat baking and a quick chill lock in that perfect crunch without any fancy equipment.
- Make‑Ahead Potential: Assemble the night before, refrigerate, and the flavors meld even more beautifully by dessert time.
Inside the Ingredient List
The Flavor Base
Egg Whites (4 large): They’re the backbone of the meringue, providing structure and that ethereal lightness. Fresh, room‑temperature whites whip up faster and achieve higher volume. Skipping them? You’ll end up with a dense, flat pancake instead of a cloud.
Caster Sugar (1 cup): This fine sugar dissolves completely, giving the meringue its glossy finish and subtle sweetness. If you use regular granulated sugar, you’ll notice a gritty texture that ruins the smoothness.
White Vinegar (½ tsp): The acid stabilizes the egg whites, preventing them from weeping later on. A common mistake is to omit it, which leads to soggy edges—trust me, we’ve all been there.
The Texture Crew
Cornstarch (1 tsp): This little hero absorbs extra moisture, keeping the meringue crisp for longer. If you’re gluten‑free, cornstarch is your best friend here.
Heavy Cream (2 cups): Whipped to soft peaks, it creates that luxurious, melt‑in‑your‑mouth layer that balances the crisp meringue. For a lighter version, you can swap half of it with Greek yogurt, but you’ll lose some of that holiday indulgence.
Powdered Sugar (¼ cup): Sweetens the cream without making it gritty. It also helps stabilize the whipped cream, so it doesn’t collapse when you slice the trifle.
The Unexpected Star
Mixed Berries (3 cups total): A blend of strawberries, raspberries, blueberries, and blackberries provides color, acidity, and a burst of antioxidants. If you’re out of fresh berries, frozen works—just thaw and pat dry.
Fresh Lemon Zest (1 tsp): Adds a bright citrus note that cuts through the sweetness, making each bite feel like a winter sunrise. Skipping this zest is like leaving the Christmas tree without lights.
Vanilla Bean (1, split and scraped): The specks of vanilla add visual appeal and depth of flavor that vanilla extract alone can’t match. If you don’t have a bean, use 1 tsp of high‑quality extract, but the speckles will be missing.
The Final Flourish
Mint Leaves (optional, for garnish): A few fresh leaves add a pop of green and a refreshing aroma that lifts the whole dessert. Don’t overdo it, or the mint will overpower the berries.
Edible Gold Dust (optional, for sparkle): Because it’s the holidays, a pinch of edible glitter makes the trifle look like a winter wonderland on a plate.
Everything's prepped? Good. Let’s get into the real action...
The Method — Step by Step
First, preheat your oven to 250°F (120°C) and line a large baking sheet with parchment paper. I dare you to watch the oven light flicker on and feel that low‑heat anticipation—this is the moment of truth. In a clean, dry bowl, whisk the egg whites on medium speed until they become frothy, then increase to high and whisk until soft peaks form. The bowl should feel cool to the touch; if it’s warm, the whites won’t reach their full volume.
Kitchen Hack: Add the vinegar and cornstarch gradually while the mixer is running; this prevents the sugar from clumping and ensures a smooth, glossy meringue.Next, gradually add the caster sugar, one tablespoon at a time, letting each piece dissolve before adding the next. You’ll notice the mixture becoming glossy and thick, like a mirror—this is exactly what you want. Once all the sugar is incorporated, continue whisking for another 3‑4 minutes until stiff, glossy peaks form. The meringue should hold its shape when you lift the whisk, and the bowl should feel almost warm, but not hot.
Spread the meringue onto the prepared sheet, shaping it into a 9‑inch circle about 1‑inch thick, with slightly higher edges to form a shallow well. This well will hold the cream and berries later, so make sure the edges are well defined. Sprinkle a pinch of extra sugar over the top—this helps caramelize the surface during baking.
Watch Out: Do not open the oven door during the first 20 minutes, or the meringue may collapse due to a sudden temperature drop.Slide the sheet into the oven and bake for 1 hour and 15 minutes, then turn off the oven and leave the door ajar, allowing the meringue to cool completely inside. This slow cooling prevents cracks—think of it as letting a newborn nap undisturbed. When you finally pull it out, the surface should be a pale ivory with a faint golden hue around the edges, and the edges will have gently pulled away from the parchment.
While the meringue cools, whip the heavy cream with powdered sugar, vanilla bean seeds, and a pinch of salt until soft peaks form. The cream should double in volume and have a silky sheen—if you run a finger through, it should leave a clean line that holds for a few seconds. For extra stability, chill the mixing bowl and whisk attachment beforehand; this tiny step makes a world of difference.
Now, prepare the berry coulis: combine half of the mixed berries with a splash of lemon juice in a saucepan, then simmer gently for 5 minutes until the berries break down. Blend the mixture until smooth, then strain through a fine mesh to remove seeds. The coulis should be glossy, deep‑red, and slightly thick—think of it as liquid velvet.
Assemble the trifle by placing the cooled meringue on a large serving platter. Spoon a generous layer of whipped cream into the well, spreading it out to the edges. Then scatter a handful of fresh berries over the cream, followed by a drizzle of the berry coulis. Repeat the layers if you have a larger meringue base, but remember: the final top should be a crown of berries, a swirl of coulis, and a sprinkle of mint leaves for that festive pop.
Finish with a light dusting of powdered sugar and, if you’re feeling extra festive, a pinch of edible gold dust. This final flourish makes the trifle look like a snow‑capped mountain at sunrise. Let it sit for 10 minutes before serving so the flavors meld—trust me, the waiting is worth it.
Serve in individual bowls or slice the trifle like a cake, making sure each portion gets a bit of every layer. Picture yourself pulling this out of the oven, the whole kitchen smelling incredible, and your guests’ eyes widening with anticipation. This is the moment you’ve been waiting for—your holiday masterpiece is finally on the table.
That’s it—you did it. But hold on, I’ve got a few more tricks that’ll take this to another level, because why settle for good when you can have spectacular?
Insider Tricks for Flawless Results
The Temperature Rule Nobody Follows
Most home bakers bake meringues at 300°F, assuming higher heat speeds up the process. In reality, that high temperature creates a crisp exterior but leaves the interior gummy. Keep the oven at a low 250°F and extend the bake time; this gentle heat dries the meringue evenly, giving you that perfect crack‑free surface. I once tried the high‑heat shortcut and ended up with a soggy mess—lesson learned.
Why Your Nose Knows Best
When the meringue is done, it will emit a faint, buttery aroma that’s almost nutty. If you smell a burnt scent, the oven is too hot or you left it in too long. Trust your nose over the timer; a few extra minutes can make the difference between “just right” and “charred.”
The 5‑Minute Rest That Changes Everything
After baking, let the meringue rest inside the turned‑off oven for five minutes with the door ajar. This gradual cooling prevents sudden contraction, which can cause cracks. I used to pull it out immediately and watch the edges split like broken glass—now I always give it that brief, gentle cooldown.
Whip It Like a Pro
When whipping cream, start on low speed and gradually increase to high. This prevents splattering and ensures the cream incorporates air evenly. Add the powdered sugar slowly; dumping it all at once can deflate the mixture. A pro tip: chill the bowl and whisk for at least 15 minutes before you start.
Berry Prep Like a Chef
Rinse berries in a bowl of cold water with a splash of lemon juice, then gently pat dry with a paper towel. This removes any lingering grit and adds a subtle shine. If you skip this step, you’ll get soggy berries that bleed into the cream, turning it pink and watery.
Creative Twists and Variations
This recipe is a playground. Here are some of my favorite ways to switch things up:
Chocolate‑Laced Pavlova
Replace 2 tablespoons of the caster sugar with cocoa powder, and fold in ¼ cup of melted dark chocolate into the whipped cream. The result is a rich, velvety contrast that pairs beautifully with the tart berries. Perfect for chocolate lovers who still want that festive sparkle.
Tropical Holiday
Swap the mixed berries for diced mango, pineapple, and passion fruit. Add a splash of coconut cream to the whipped topping and garnish with toasted coconut flakes. This version transports you to a sun‑kissed beach while still feeling holiday‑appropriate.
Nutty Crunch
Fold toasted almond slivers or pistachio crumbs into the whipped cream layer, and drizzle a caramel‑nut sauce over the top. The nutty crunch adds an unexpected texture that elevates the dessert to a new level of indulgence.
Vegan Delight
Use aquafaba (the liquid from a can of chickpeas) in place of egg whites, and replace heavy cream with coconut whipped cream sweetened with maple syrup. The flavor profile shifts slightly, but the texture remains airy and the berries still shine.
Spiced Winter
Add a pinch of ground cinnamon, nutmeg, and cardamom to the whipped cream, and incorporate a drizzle of spiced orange marmalade between the layers. This gives the trifle a warm, comforting flavor that screams “cozy night by the fire.”
Mini Pavlova Cups
Instead of one large trifle, pipe the meringue into silicone muffin cups, bake individually, and assemble as bite‑size parfaits. These are perfect for cocktail parties where guests can grab a single, elegant spoonful.
Storing and Bringing It Back to Life
Fridge Storage
Cover the assembled trifle loosely with plastic wrap and refrigerate for up to 24 hours. The meringue will stay crisp if kept dry, and the cream will firm up, making slicing easier. If you notice any moisture on the surface, gently pat it dry with a paper towel before serving.
Freezer Friendly
Wrap the baked meringue tightly in foil, then place it in a freezer‑safe bag for up to 2 months. When you’re ready to use it, thaw in the refrigerator overnight, then re‑crisp by placing it in a 200°F oven for 5 minutes. This restores that fresh‑out‑of‑the‑oven crunch.
Best Reheating Method
To revive a slightly softened trifle, add a tiny splash of water to the bottom of the serving dish and cover with foil. Warm in a 300°F oven for 8‑10 minutes; the steam will bring back the meringue’s snap while keeping the cream from drying out. This trick works like magic on a chilly winter morning.