Picture this: I’m standing in my kitchen, the timer on my old microwave buzzing like an impatient neighbor, and a half‑finished batch of brownies is staring back at me with a sad, flat top. I had just attempted the “classic” chocolate brownie from a box mix, and it turned out about as exciting as plain oatmeal. My friend dared me to “make something that actually feels like autumn in a bite,” and I thought, “Why not throw pumpkin into the mix and see what happens?” Little did I know I was about to stumble upon the most decadent, swirl‑filled masterpiece that would make my grandma’s holiday pies jealous. I’m still laughing at how a simple panic‑induced experiment turned into a game‑changing dessert.
The moment the pumpkin puree hit the bowl, the kitchen filled with an aroma that was both earthy and sweet, like a walk through a pumpkin patch after a light rain. The cocoa powder, dark as midnight, swirled into the orange‑golden puree, creating a marbled effect that looked like a painter’s canvas. I could hear the faint sizzle of the buttered pan as I poured the batter, and the sound reminded me of a crackling fire on a chilly October night. My fingertips felt the silky smoothness of the batter, and I knew this was going to be something special—rich, fudgy, and with a hint of spice that would make your taste buds do a little happy dance.
What makes this version truly stand out is the balance of flavors and textures. Most pumpkin dessert recipes either drown in spice or get lost in the chocolate, but this one hits the sweet spot: the cocoa gives depth, the pumpkin adds moisture and a subtle earthiness, and the chocolate chips provide those glorious pockets of melt‑in‑your‑mouth goodness. The batter is simple enough for a weekday treat yet sophisticated enough to impress at a holiday gathering. And here’s the kicker: I’m using a pumpkin pie spice blend that’s just the right amount of warmth without overpowering the chocolate—no one ever told me that was possible.
But wait, there’s a secret technique I’m about to reveal that most recipes completely miss. Instead of mixing the pumpkin and chocolate together, I swirl them at the very end, creating a beautiful marbled pattern that looks as good as it tastes. It’s like painting a masterpiece, except you get to eat the canvas. I dare you to taste this and not go back for seconds. Let me walk you through every single step — by the end, you’ll wonder how you ever made it any other way.
What Makes This Version Stand Out
- Flavor Harmony: The marriage of deep cocoa and sweet pumpkin creates a taste that feels both comforting and indulgent, like a cozy blanket on a crisp fall evening.
- Texture Contrast: You get a fudgy interior with crisp edges that pull away from the pan, and hidden pockets of melted chocolate chips that burst with each bite.
- Simplicity: Only twelve ingredients, all pantry‑friendly, and no fancy equipment—just a whisk, a bowl, and a good eye for swirling.
- Unique Swirl: The final swirl technique gives each slice a beautiful marble look, making it Instagram‑ready without any artificial coloring.
- Crowd Reaction: Guests often say “Is this pumpkin? Is this chocolate?” and then dive in, proving the surprise factor is as big as the flavor.
- Ingredient Quality: Using pure pumpkin puree (not canned pie filling) and high‑quality cocoa powder ensures the flavor shines through without any off‑notes.
- Baking Method: Baking at a moderate temperature keeps the brownies moist while allowing the edges to crisp, a balance many recipes miss.
- Make‑Ahead Potential: These brownies keep beautifully for up to a week, and they freeze like a dream, so you can prep ahead for holiday parties.
Inside the Ingredient List
The Flavor Base
Unsweetened cocoa powder is the backbone of any good brownie, providing that intense, slightly bitter chocolate flavor that balances the natural sweetness of pumpkin. If you skimp on quality cocoa, you’ll end up with a dull, flat taste that feels more like a chocolate‑flavored cake than a brownie. A good tip is to sift the cocoa with the flour; this prevents clumps and ensures a smooth batter. If you’re out of cocoa, you can substitute with an equal amount of melted dark chocolate, but expect a richer, slightly oilier texture.
The Texture Crew
All‑purpose flour gives structure, while the combination of granulated sugar and brown sugar creates a caramelized crust and moist interior. The brown sugar’s molasses adds depth, making the brownies taste a touch like toffee. The vegetable oil replaces butter for a tender crumb and a glossy finish; it also keeps the brownies moist longer. If you prefer a buttery flavor, you can swap half the oil for melted unsalted butter, but be careful not to over‑mix, or you’ll develop gluten and lose that fudgy feel.
The Unexpected Star
Pumpkin puree is the hero of this recipe. It brings moisture, a subtle earthiness, and a natural sweetness that lets you reduce the overall sugar a bit without sacrificing flavor. When choosing pumpkin, look for 100 % pure pumpkin puree in a glass jar or can—avoid “pumpkin pie filling” which contains spices and sweeteners that will throw off the balance. If fresh pumpkin is your jam, roast a small sugar pumpkin, scoop out the flesh, and puree it in a food processor; the result is even more aromatic.
The Final Flourish
Pumpkin pie spice adds that quintessential autumn note—cinnamon, nutmeg, ginger, and cloves—all in one. It’s the secret whisper that tells your brain, “It’s fall,” without overwhelming the chocolate. The chocolate chips are the surprise party in the middle, delivering pockets of pure chocolate bliss. If you’re dairy‑free, swap them for dairy‑free chocolate chips; the texture remains the same.
Everything's prepped? Good. Let's get into the real action...
The Method — Step by Step
Preheat your oven to 350°F (175°C). While the oven warms up, line a 9‑inch square baking pan with parchment paper, letting the edges overhang for easy lift‑out later. This step is crucial because a well‑lined pan prevents sticking and gives you those clean, crisp edges that shatter like thin ice when you break a piece. I like to give the parchment a quick spray of non‑stick cooking spray; it adds a subtle sheen to the bottom.
In a large mixing bowl, whisk together the cocoa powder, flour, baking powder, and salt. Sifting these dry ingredients together not only removes lumps but also aerates the mixture, leading to a lighter crumb. The moment you see the powder float like a soft cloud, you know you’re on the right track. Watch out: Over‑mixing at this stage can develop gluten, resulting in a cakey texture rather than the fudgy perfection we’re after.
In a separate bowl, combine the granulated sugar, brown sugar, and vegetable oil. Stir until the mixture is glossy and the sugars start to dissolve—this should take about 2 minutes. The sugar‑oil blend creates a glossy base that will later give the brownies that beautiful crackle on the surface.
Watch Out: If the oil is too cold, the sugar won’t dissolve properly, leading to a gritty texture.Crack the four large eggs into the sugar‑oil mixture, add the vanilla extract, and whisk vigorously until the batter is light and slightly frothy. The eggs act as the binder, giving the brownies structure while keeping them moist. When you lift the whisk, you should see a thin ribbon of batter that slowly falls back—this is the sign of a well‑emulsified mixture. I dare you to taste a tiny spoonful now; you’ll notice the subtle vanilla echo that will later mingle with pumpkin and chocolate.
Fold the dry ingredient blend into the wet mixture using a spatula, moving in gentle circles until just combined. Over‑mixing here is the silent killer of fudgy brownies, so stop as soon as you no longer see streaks of flour. The batter should be thick, almost like a brownie‑specific batter that clings to the spatula.
Divide the batter in half. To one half, add the pure pumpkin puree and pumpkin pie spice, stirring until fully incorporated. The pumpkin mixture will turn a warm orange, and the spice will perfume the air like a bakery in autumn. To the other half, fold in the chocolate chips, ensuring they are evenly distributed. This separation is key for that stunning swirl effect later.
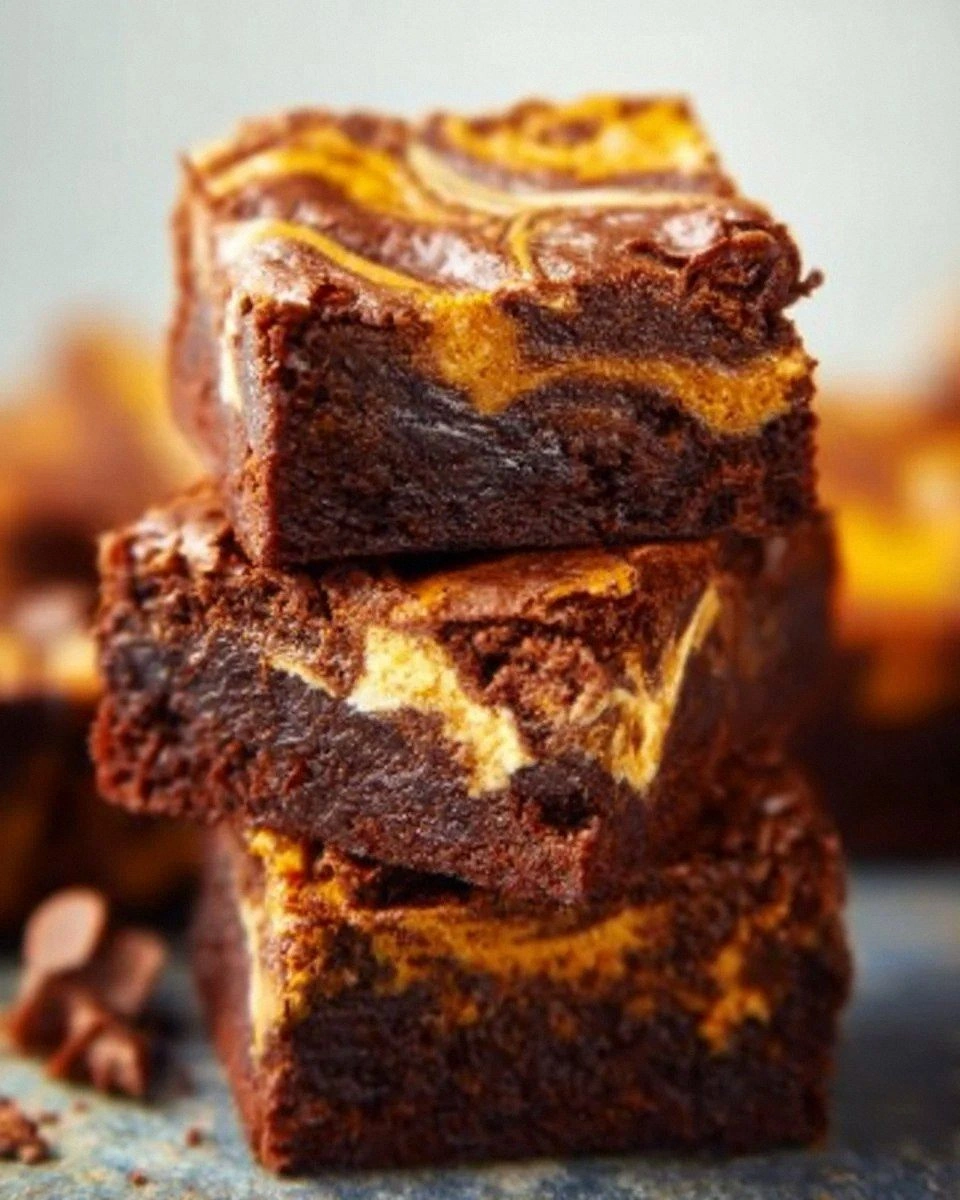
Pour the chocolate‑chip batter into the prepared pan, spreading it evenly with the back of a spoon. Then, dollop the pumpkin batter on top in generous spoonfuls. Using a skewer, a butter knife, or even a bamboo skewer, gently swirl the two batters together in a figure‑eight motion.
The result should look like a marble countertop—dark chocolate veins cutting through a sunrise‑colored field.Kitchen Hack: For a tighter swirl, tilt the pan slightly while swirling; gravity helps the batter mingle in elegant ribbons.Slide the pan into the preheated oven and bake for 30‑35 minutes. The brownies are done when the edges pull away from the pan and a toothpick inserted into the center comes out with a few moist crumbs but no wet batter. The top should have a slight sheen and a faint crackle. Resist the urge to open the oven door early; the sudden temperature drop can cause the brownies to sink.
Allow the brownies to cool completely in the pan on a wire rack—this takes about 20 minutes. As they cool, the flavors continue to meld, and the swirl pattern sets, making each slice a work of art. Once cooled, use the parchment overhang to lift the whole slab out, then cut into squares. I’m honest—I ate half the batch before anyone else got to try it, but you’ll understand why once you taste them.
That's it — you did it. But hold on, I've got a few more tricks that'll take this to another level...
Insider Tricks for Flawless Results
The Temperature Rule Nobody Follows
Always start with a fully preheated oven. The initial blast of heat creates that coveted “crackly” top while keeping the interior soft. If your oven runs cool, use an oven thermometer and add a few extra minutes; consistency is key. I once baked at a lower temperature and ended up with a soggy center—lesson learned.
Why Your Nose Knows Best
Trust the aroma. About five minutes before the timer dings, you’ll start smelling toasted chocolate and warm pumpkin. If the scent is strong and inviting, the brownies are likely done, even if the toothpick shows a tiny crumb. This sensory cue is a reliable backup when your oven’s thermostat is finicky.
The 5‑Minute Rest That Changes Everything
After removing the pan from the oven, let the brownies sit, uncovered, for exactly five minutes before covering them with a clean kitchen towel. This short rest lets steam escape, preventing sogginess on the bottom while the interior sets perfectly. Skipping this step is the reason many brownies turn out gummy.
Chocolate Chip Distribution Hack
To avoid clumping, toss the chocolate chips with a teaspoon of flour before folding them into the batter. The flour coats the chips, keeping them suspended evenly throughout the brownie matrix. A friend once tried this and swore the chips didn’t sink to the bottom—pure magic.
Pan Choice Matters
Using a glass baking dish yields a more even bake and a slightly chewier edge, while metal pans give crisper sides. I prefer a dark, non‑stick metal pan for that extra crunch. If you only have a glass pan, lower the oven temperature by 25°F and add an extra five minutes to the bake time.
Creative Twists and Variations
This recipe is a playground. Here are some of my favorite ways to switch things up:
White Chocolate & Cranberry Swirl
Swap the dark chocolate chips for white chocolate chunks and fold in dried cranberries into the pumpkin batter. The tart cranberries cut through the sweetness, while white chocolate adds a creamy contrast. Perfect for a holiday twist that still feels autumnal.
Spiced Chai Infusion
Replace the pumpkin pie spice with a chai spice blend (cardamom, cinnamon, ginger, cloves) and add a splash of brewed chai tea to the wet ingredients. This gives the brownies an exotic, aromatic profile that pairs beautifully with the cocoa.
Nutty Crunch
Stir in ½ cup toasted pecans or walnuts into the chocolate batter for added texture. The nuts bring a buttery crunch that complements the soft swirl, and they also add a dose of healthy fats.
Vegan Version
Swap the eggs for a flax‑egg mixture (2 tbsp ground flaxseed + 6 tbsp water per egg) and use coconut oil in place of vegetable oil. The result is just as fudgy, and the pumpkin flavor shines even brighter without the eggy undertone.
Double Chocolate Delight
Increase the cocoa powder to 1½ cups and add a tablespoon of instant espresso powder for a deep, mocha‑like flavor. The espresso amplifies the chocolate without tasting like coffee, creating a sophisticated adult‑only treat.
Gluten‑Free Adaptation
Replace the all‑purpose flour with a 1:1 gluten‑free flour blend. Ensure the blend contains xanthan gum for structure. The texture remains wonderfully chewy, and the flavor stays true to the original.
Storing and Bringing It Back to Life
Fridge Storage
Place the cooled brownies in an airtight container and store them in the refrigerator for up to five days. The chill keeps the chocolate chips firm and prevents the brownies from drying out. Before serving, let them sit at room temperature for 15 minutes to regain that soft, melt‑in‑your‑mouth texture.
Freezer Friendly
Wrap the entire slab tightly in plastic wrap, then a layer of aluminum foil, and freeze for up to three months. When you’re ready to indulge, transfer to the fridge to thaw overnight, then warm gently in the oven at 300°F for 10 minutes. The result is as fresh as the day they were baked.
Best Reheating Method
To revive a single slice, place it on a microwave‑safe plate, sprinkle a tiny splash (about a teaspoon) of water around the edges, and microwave on medium power for 20‑30 seconds. The steam created by the water restores moisture, giving you that just‑out‑of‑the‑oven softness without turning the brownies rubbery.