I still remember the day I nearly set my kitchen on fire trying to make a pumpkin cake. The smoke alarm was wailing, my roommate was fanning the oven with a dish towel like some kind of culinary superhero, and I was standing there holding a charred cake pan wondering where it all went wrong. Fast forward three years and countless experiments later, and I've cracked the code on what I genuinely believe is the most addictive autumn dessert you'll ever taste. This isn't just another pumpkin cake recipe — this is the pumpkin honey bun cake that converted my pumpkin-skeptic best friend into a fall baking evangelist.
Picture this: it's a crisp October afternoon, the kind where golden leaves swirl past your window and the air smells like possibility. You're in your kitchen, sleeves rolled up, and the scent of warm spices is curling through your house like a cozy blanket. The cake you're about to make doesn't just taste like autumn — it is autumn, distilled into a tender, swirled masterpiece that sits somewhere between breakfast and dessert, between cake and coffee cake, between "I'll have just one slice" and "how did I eat half the pan?"
What makes this version different? For starters, we're not just dumping canned pumpkin into a boxed cake mix and calling it a day. We're building layers of flavor that would make a French pastry chef weep with joy. The honey doesn't just sweeten — it creates this glossy, sticky top layer that seeps into every cranny of the cake, making each bite taste like you're eating a pumpkin-spiced cloud that's been kissed by bees. And the spice blend? It's not your grocery-store pumpkin pie spice. We're talking about a custom blend that makes your kitchen smell like you've been simmering mulled wine for hours.
Here's the kicker — this cake actually gets better the next day. Most cakes dry out, but this one stays impossibly moist thanks to a secret technique I'll share in a minute. Plus, I'm going to show you how to create those signature honey bun swirls that make people think you bought this from some artisanal bakery. Trust me, when you pull this out of the oven and that honey-cinnamon aroma hits your face, you'll understand why my neighbor once offered to pay me to make this for her book club. Let me walk you through every single step — by the end, you'll wonder how you ever made it any other way.
What Makes This Version Stand Out
Pumpkin Perfection: We're using exactly one cup of pumpkin puree — not a drop more, not a drop less. This creates the ideal moisture balance where the cake stays tender for days without becoming dense or gummy like so many pumpkin desserts that feel like you're eating spiced baby food.
Honey Magic: The honey doesn't just sweeten; it creates this incredible sticky top crust that crackles slightly when you cut into it, revealing a tender crumb underneath. It's like having a honey bun and a coffee cake decide to have a beautiful autumn baby together.
Spice Symphony: Most recipes get this completely wrong — they either go too timid and you can't taste anything, or they dump in so much spice that your mouth feels like you licked a cinnamon challenge. Our custom blend hits that perfect middle ground where each spice has a solo moment but they all harmonize together.
Texture Heaven: The edges get these crispy, caramelized bits while the center stays pillowy soft. It's like if a cloud and a crème brûlée had a love child, and that child decided to dress up as autumn for Halloween.
Make-Ahead Marvel: This cake travels like a dream and actually improves overnight. I made this for a potluck once, forgot it on the counter, and discovered the next morning that it had transformed into something even more spectacular. My roommate and I may have eaten it for breakfast. Don't judge.
Crowd-Pleasing Power: I've served this to people who claim they "don't like pumpkin desserts" and watched them go back for thirds. One friend texted me at midnight asking if I had any left because she was having "withdrawal symptoms." This cake has powers, I'm telling you.
Alright, let's break down exactly what goes into this masterpiece...
Inside the Ingredient List
The Flavor Base
Let's start with the star of the show: pumpkin puree. Not pumpkin pie filling — those are entirely different beasts. You want the plain, unsweetened stuff that looks like autumn in a can. One cup gives us that gorgeous orange color and keeps the cake impossibly moist without making it taste like you're eating Thanksgiving dinner in cake form. If you can find it, Libby's brand really does have the best texture, but any 100% pumpkin works. Just promise me you won't use that pumpkin pie mix that's already spiced and sweetened, or we'll have words.
The sugars play a crucial duet here. Granulated sugar gives us structure and that classic cake sweetness, while brown sugar brings the molasses notes that make everything taste deeper and more complex. Together they create this caramelized edge around the cake that's so good you'll be fighting people for the corner pieces. If you're out of brown sugar, you can make your own by mixing white sugar with a tablespoon of molasses, but honestly, the store-bought stuff works perfectly here.
The Texture Crew
All-purpose flour is our foundation, but here's where most recipes mess up — they don't treat it right. We're going to whisk it with the leavening agents first, which sounds fussy but prevents those bitter baking powder pockets that can ruin your life (and your cake). Two cups is the magic number that gives us enough structure to support all that pumpkin and honey without turning into bread. Cake flour makes this too delicate; bread flour makes it tough. All-purpose is Goldilocks here.
Oil versus butter is a real debate in cake circles, but for this recipe, vegetable oil wins hands down. Butter would firm up when cold and create a weird, almost waxy texture in the fridge. Oil keeps everything tender and luxurious even days later. Plus, it lets the other flavors shine instead of competing with them. Use a neutral oil like canola or grapeseed — olive oil would taste like you're eating a salad gone wrong.
The Unexpected Star
The honey is where we separate the adults from the children. Don't you dare use that plastic bear honey that's been sitting in your pantry since 2019. Get the good stuff — wildflower honey if you can find it, but any real honey beats the fake stuff. The honey creates this incredible sticky glaze that seeps into the cake and creates these pockets of concentrated sweetness. It's like nature's caramel, and it plays beautifully with the warm spices.
Vanilla extract might seem boring, but it's the ingredient that makes everything else taste more like itself. It's like the bass player in a band — you don't always notice it, but you'd miss it if it were gone. Two teaspoons is the sweet spot where it enhances the other flavors without taking over the show. If you want to get fancy, vanilla bean paste works too, but honestly, the regular extract is perfect.
The Final Flourish
Our spice blend is where we get to play mad scientist. Cinnamon brings warmth, nutmeg adds that mysterious depth, ginger gives us a little zing, and together they create the flavor equivalent of jumping into a pile of autumn leaves. Fresh spices matter more than you'd think — if your cinnamon has been sitting around since last year, it might as well be sawdust. Give it a sniff; if it doesn't make you want to eat it straight from the jar, it's too old.
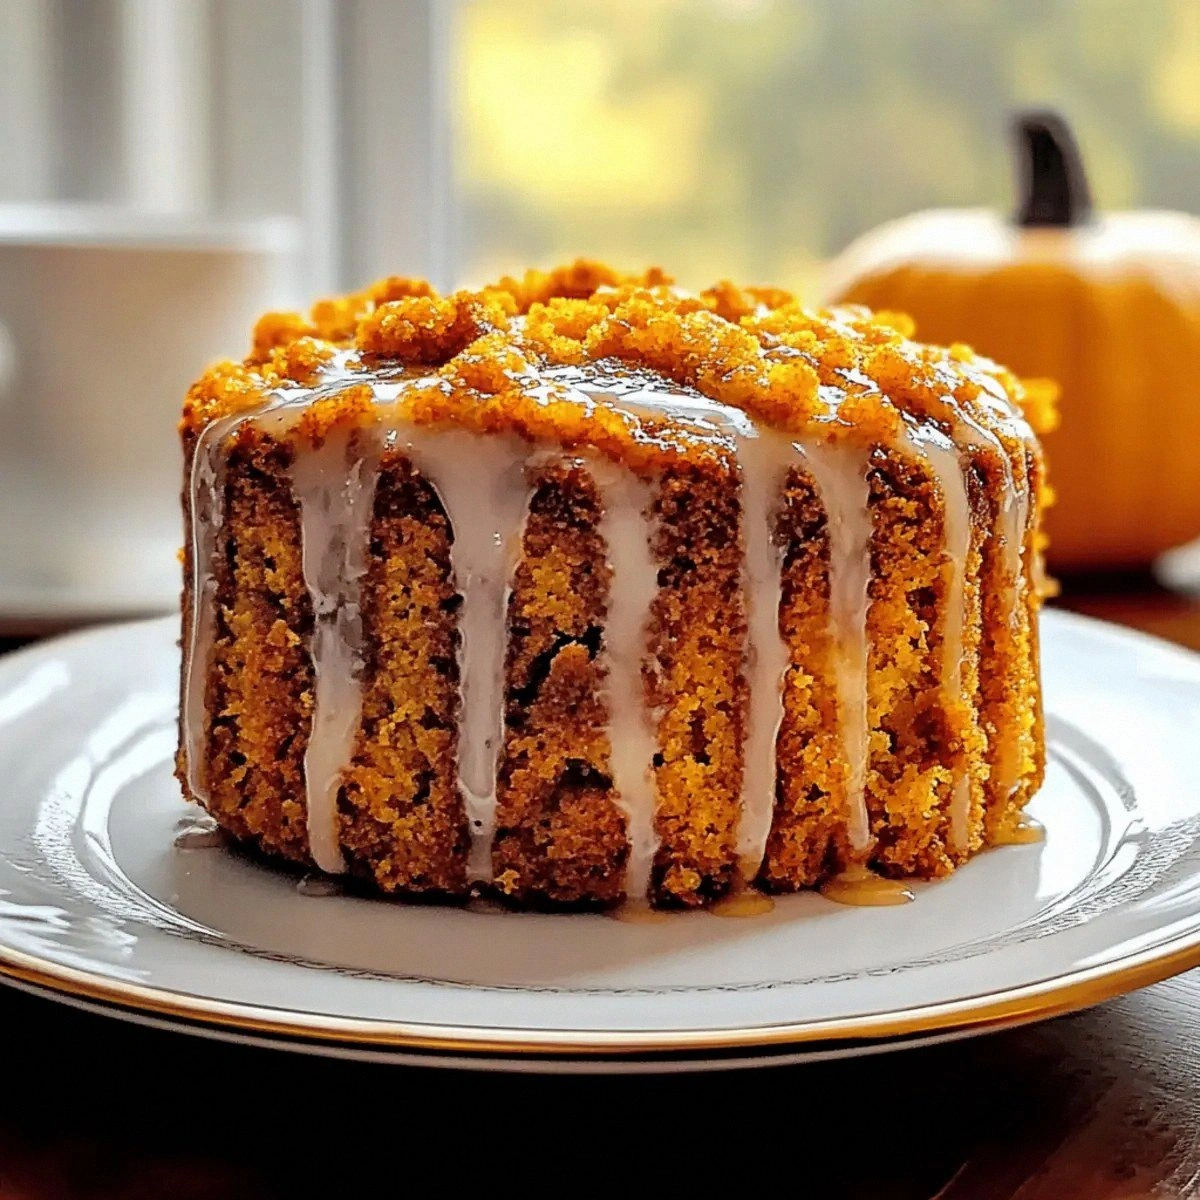
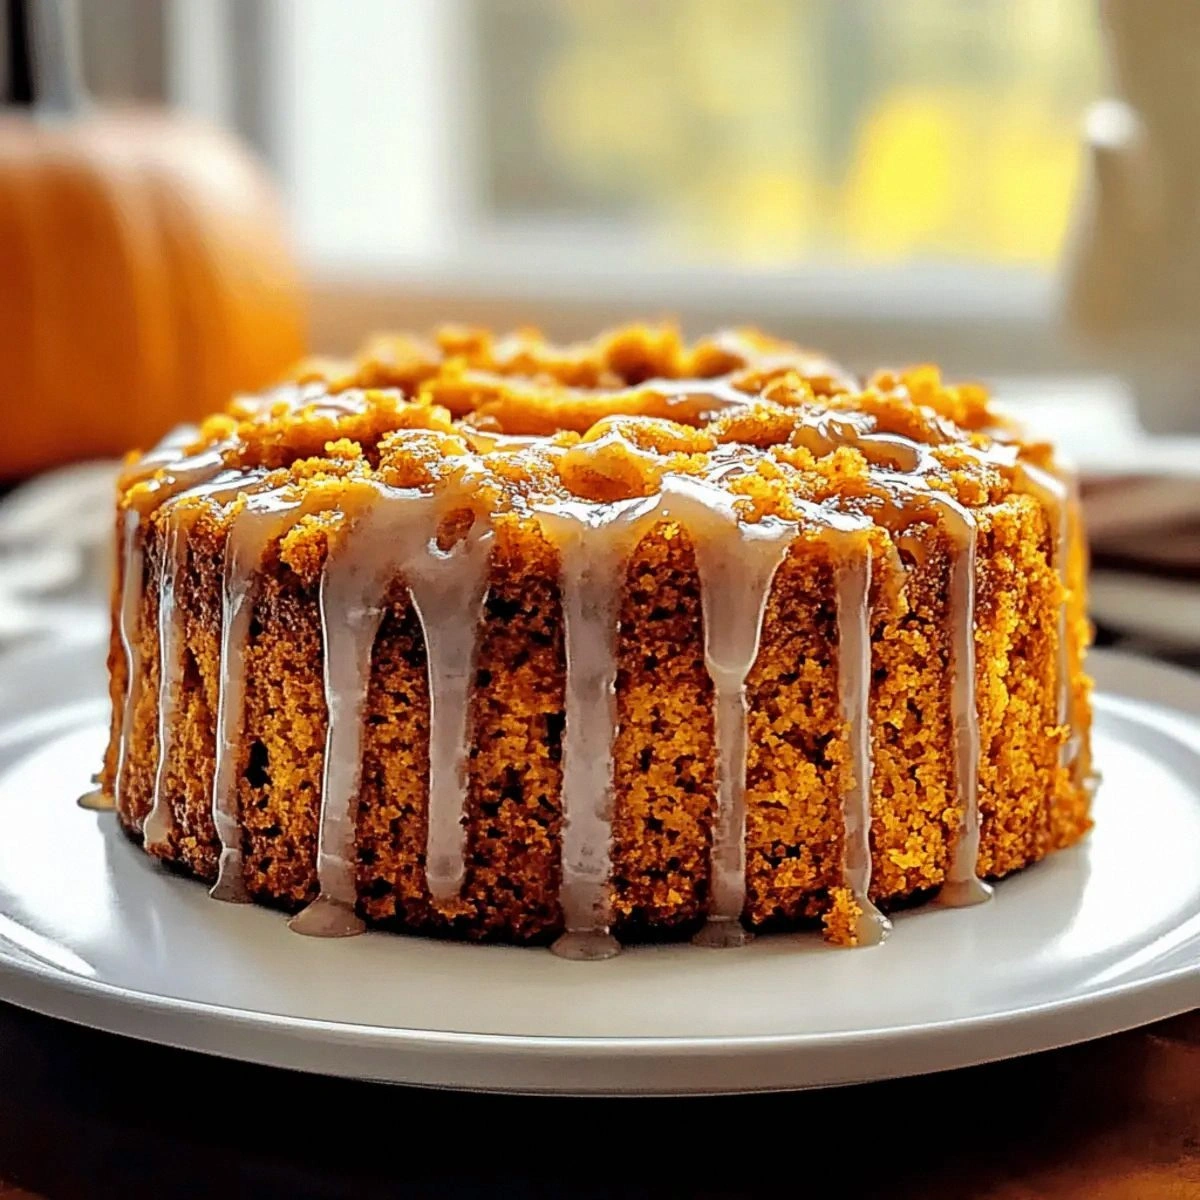
The powdered sugar in the glaze isn't just for sweetness — it creates that beautiful white contrast against the amber cake, like frost on autumn leaves. It dissolves into the honey and milk to make this pourable glaze that sets into a crackly top. If your powdered sugar has lumps, sift it first or you'll end up with glaze that looks like it has cottage cheese in it, and nobody wants that.
Everything's prepped? Good. Let's get into the real action...
The Method — Step by Step
- Preheat your oven to 350°F (175°C) and position the rack in the center. This isn't the time to get creative with oven placement — center rack ensures even baking. Grease a 9x13-inch baking pan with butter or non-stick spray, then line it with parchment paper leaving an overhang on the sides. These "handles" will save your sanity later when you're trying to get perfect slices out without destroying your beautiful cake. Trust me, I learned this the hard way after serving a cake that looked like it had been attacked by wild animals.
- In a medium bowl, whisk together the flour, baking powder, baking soda, salt, cinnamon, nutmeg, and ginger for a full 30 seconds. This might seem excessive, but properly distributed leavening agents are the difference between a cake that rises like a dream and one that has weird volcanic craters. The spices should smell intoxicating at this point — if they don't, your spices are too old and you need new ones. Set this aside and resist the urge to stick your face in the bowl, though I won't judge if you do.
- In a large bowl, whisk together the granulated sugar, brown sugar, and pumpkin puree until completely combined. The mixture should look like autumn sunshine — all golden and promising. Make sure to break up any brown sugar lumps now, because once you add the wet ingredients, they'll be harder to find and eliminate. This is also when your kitchen starts smelling like a pumpkin patch, which is your first clue that good things are coming.
- Add the oil, eggs, and vanilla to the pumpkin mixture and whisk until smooth. The batter should look glossy and luxurious, like liquid velvet. If your eggs are cold, they'll seize up the oil and create a curdled mess — room temperature is crucial here. Whisk for about a minute to really incorporate air, which helps with the final texture. This is the foundation of your cake, so take your time and enjoy watching it come together.
- Gently fold the dry ingredients into the wet using a spatula, mixing just until you don't see any dry flour. Overmixing develops gluten and creates a tough cake, and nobody wants to eat pumpkin-flavored rubber. The batter will be thick and voluptuous, more like a quick bread than a traditional cake batter. That's exactly what we want — it means the cake will be moist and tender, not dry and crumbly like so many pumpkin disasters.
- Pour the batter into your prepared pan and smooth the top with your spatula. Give the pan a gentle tap on the counter to release any air bubbles — you'll see them rise to the surface like tiny cake volcanoes. This prevents your cake from having weird holes that the honey glaze will pool in. The batter should fill the pan about halfway up the sides, leaving room for the cake to rise without overflowing and creating a smoky mess in your oven.
- Bake for 30-35 minutes, but start checking at 25 minutes. Every oven is different, and pumpkin cakes can go from perfectly moist to Sahara-dry in the blink of an eye. The cake is done when a toothpick inserted in the center comes out with just a few moist crumbs — not wet batter, but not completely clean either. The edges should be pulling away from the sides slightly, and the top should spring back when gently pressed. If you wait until a toothpick comes out completely clean, you've overbaked it and we can't be friends anymore.
- While the cake bakes, whisk together the powdered sugar, honey, and milk for the glaze. Start with 2 tablespoons of milk and add more if needed — you want it pourable but not so thin that it just soaks into the cake. The glaze should ribbon off your whisk and disappear slowly back into the bowl. If it's too thick, add milk a teaspoon at a time. Too thin? Add more powdered sugar. This glaze is what takes the cake from "pretty good" to "I need to be alone with this cake."
- When the cake comes out of the oven, immediately poke holes all over it with a toothpick or skewer. This is the moment of truth — those holes are highways for the glaze to seep into every bite. Don't be shy here; really go to town. I usually make about 50 holes, which sounds excessive until you taste how the glaze distributes. Pour the glaze over the warm cake and watch it disappear into those holes like magic, creating pockets of honeyed sweetness throughout.
That's it — you did it. But hold on, I've got a few more tricks that'll take this to another level...
Insider Tricks for Flawless Results
The Temperature Rule Nobody Follows
Here's where most home bakers mess up: they serve the cake too hot or too cold. When it's piping hot, the flavors haven't had time to meld and the honey glaze is still liquid. When it's refrigerator-cold, the oil firms up and the cake tastes heavy. The sweet spot is room temperature, about 2 hours after baking, or 30 minutes after taking it out of the fridge. This is when the spices really sing and the texture is at its most tender. I dare you to taste this at the right temperature and not go back for seconds — it's physically impossible.
Why Your Nose Knows Best
Your sense of smell is your best tool for knowing when this cake is perfectly baked. When you start smelling the spices intensify and the honey caramelize — about 5 minutes before it's done — that's your cue to start testing. The aroma should make you want to stick your face in the oven (don't do this). If your kitchen doesn't smell like autumn exploded in the best possible way, something's wrong with your spices or your oven temperature is off. Pro tip: if you can't smell anything, your spices are too old and you need to start fresh.
The 5-Minute Rest That Changes Everything
After you pour on the glaze, let the cake sit for exactly 5 minutes before cutting. This isn't just for show — it allows the glaze to set slightly so it doesn't all run off when you cut the first piece. But don't wait longer than 10 minutes, or the glaze will set up too much and you won't get that beautiful drip effect. I've timed this obsessively (my friends think I have a problem), and 5-7 minutes is the golden window. The cake should still be warm enough that the glaze is glossy, but cool enough that it stays put.
Creative Twists and Variations
This recipe is a playground. Here are some of my favorite ways to switch things up:
The Maple Bourbon Version
Swap the honey for pure maple syrup and add 2 tablespoons of bourbon to the glaze. The maple brings a deeper, more complex sweetness than honey, and the bourbon cooks off but leaves behind this incredible warmth. It's like drinking a maple old fashioned in cake form. This version is especially dangerous because you can't taste the alcohol, so you eat half the pan and then wonder why you're giggling at everything. My book club still talks about this variation from last year.
The Chocolate Chip Dream
Fold in 1 cup of mini chocolate chips to the batter before baking. The chips create these little pockets of chocolate that pair surprisingly well with the warm spices. Use mini chips instead of regular ones — they distribute more evenly and don't sink to the bottom like their larger counterparts. The chocolate adds richness without overwhelming the pumpkin, creating this perfect balance that makes people ask "what's in this?" in the best possible way.
The Orange Zest Brightener
Add the zest of one orange to the wet ingredients. The citrus oil brightens everything and adds a sophisticated note that makes the spices pop. It's like adding a squeeze of lemon to soup — you might not identify it specifically, but you'd miss it if it were gone. This version is perfect for people who think pumpkin desserts are too heavy or one-note. The orange adds this beautiful perfume that wafts through your kitchen and makes your neighbors jealous.
The Nutty Crunch Edition
Sprinkle 1/2 cup of chopped pecans or walnuts over the batter before baking. They toast as the cake bakes, creating these crunchy bits that contrast beautifully with the tender cake. The nuts also give the glaze something to cling to, creating these gorgeous honeyed clusters. If you're feeling fancy, toast the nuts first for even deeper flavor. Just don't walk away while they're toasting — nuts go from perfectly golden to bitter and burnt faster than you can say "pumpkin spice."
The Cream Cheese Swirl
Beat 8 ounces of cream cheese with 1/4 cup sugar and dollop it over the batter before baking. Use a knife to swirl it through, creating these beautiful marbled patterns. The tang of the cream cheese balances the sweetness of the honey glaze, and the creamy pockets are like finding buried treasure in every bite. This version is richest, so cut smaller pieces or plan to share (or don't — I won't tell).
The Savory-Sweet Version
Reduce the sugars by 1/4 cup each and add 1/2 teaspoon of black pepper and 1/4 teaspoon of cayenne. The subtle heat plays beautifully with the warm spices and creates this sophisticated flavor profile that keeps people coming back for "just one more bite" as they try to figure out what makes it so addictive. This version pairs beautifully with strong coffee or black tea, and it's the only variation I've served where people actually stopped talking to focus on eating.
Storing and Bringing It Back to Life
Fridge Storage
This cake keeps beautifully in the fridge for up to 5 days, wrapped tightly in plastic wrap or stored in an airtight container. The cold temperature actually helps the flavors meld even more, creating this amazing depth that wasn't there on day one. Just make sure it's completely cool before wrapping, or condensation will make the top sticky in a bad way. I've been known to hide pieces in the vegetable drawer where my roommate won't find them — it's that good.
Freezer Friendly
Wrap individual slices in plastic wrap, then foil, and freeze for up to 2 months. Thaw overnight in the fridge or for 2 hours at room temperature. The texture holds up surprisingly well, though the glaze might look slightly less glossy after freezing. Pro tip: freeze slices on a baking sheet first, then wrap them — this prevents the plastic wrap from sticking to the glaze and creating a mess that would make a toddler proud.
Best Reheating Method
Room temperature is best, but if you must reheat, microwave individual slices for 8-10 seconds only. Any longer and the glaze turns into molten lava that will burn your tongue and ruin your life. Alternatively, warm the whole cake in a 250°F oven for 10 minutes, covered with foil to prevent the top from over-browning. Add a tiny splash of water before reheating — it steams back to perfection and tastes almost as good as fresh.