There I was, standing in my kitchen at midnight, staring at a mountain of berries that were about to go bad and a half-eaten pound cake from yesterday's coffee date. My sister had challenged me to make something "Instagram-worthy" for tomorrow's brunch, but all I had was this random assortment of ingredients and about six hours before everyone would arrive. Most people would have panicked. Instead, I created what my family now calls "the trifle that ruined all other desserts for us forever." That frantic night of culinary improvisation led to this berry trifle recipe that I'm convinced will become your new go-to dessert for everything from casual Tuesday nights to your fanciest dinner parties.
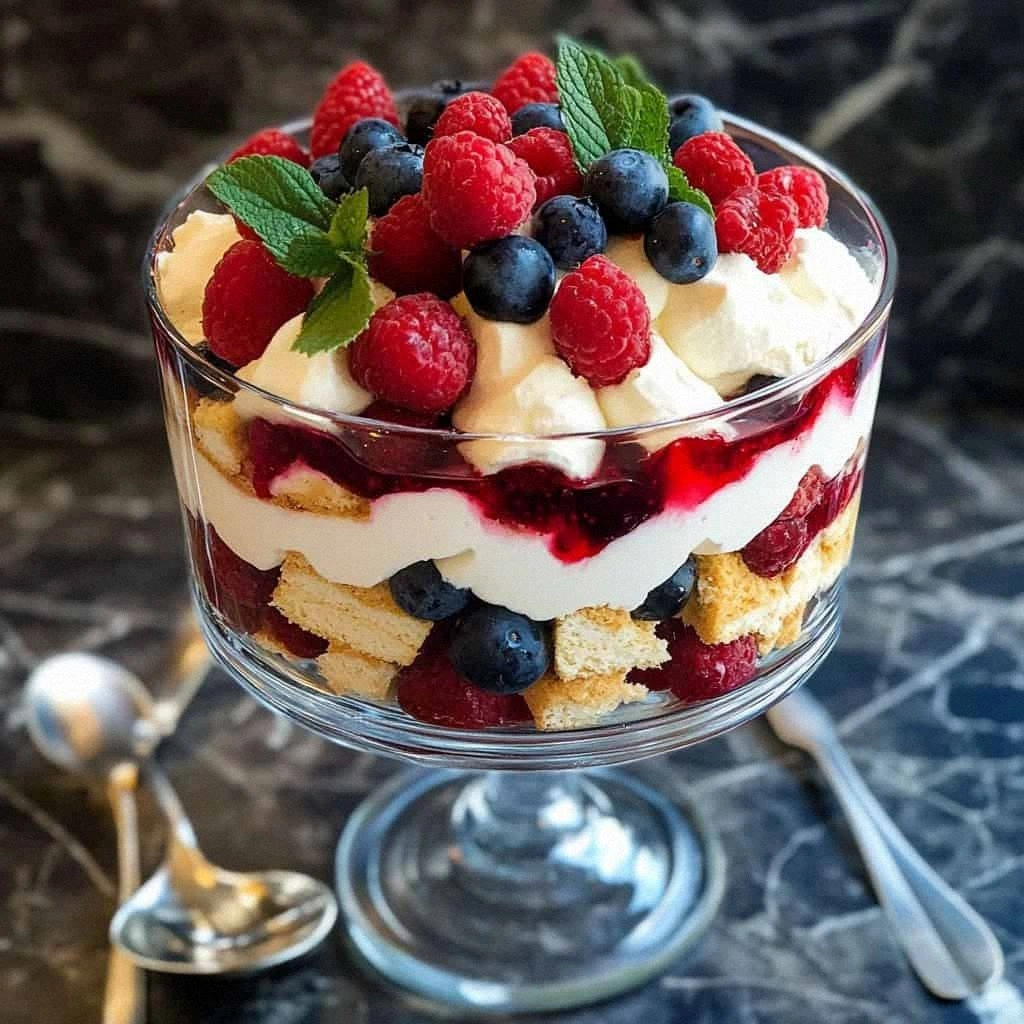
Picture this: layers of cloud-soft sponge cake soaked with just enough sherry to make it interesting, interspersed with vanilla custard so silky it makes silk feel like sandpaper, all crowned with a riot of berries that taste like someone captured summer in a bowl. The first time I served this, my notoriously dessert-picky nephew went back for thirds before I'd even finished handing out the first servings. My neighbor, who claims she "doesn't have a sweet tooth," texted me the next day asking for the recipe so she could make it twice in one weekend. This isn't just another berry trifle recipe — this is the berry trifle that will ruin you for all other desserts.
What makes this version different? I'm glad you asked. While most trifle recipes throw everything together like a sad fruit salad with cake, this one builds flavors like a symphony. Each component gets its moment to shine, from the barely-sweetened custard that makes the berries taste like they were kissed by angels, to the whisper-thin layer of toasted almonds that adds a nutty crunch you didn't know you needed. Stay with me here — this is worth it. Let me walk you through every single step — by the end, you'll wonder how you ever made it any other way.
What Makes This Version Stand Out
Cloud-Like Texture: The secret lies in whipping the cream to exactly the right peak — not too stiff, not too soft — creating layers that practically dissolve on your tongue while still holding their shape. Most recipes tell you to whip until "stiff peaks form," but that's how you end up with a trifle that tastes like you're eating sweetened butter. We're going for pillowy perfection here.
Berry-Forward Flavor: Instead of drowning the fruit in sugar, we macerate them with just enough sweetness to enhance their natural flavors, plus a hit of lemon that makes each berry taste like it's been individually optimized for maximum deliciousness. The result? Berries that taste more like themselves than they did in nature.
Make-Ahead Magic: This trifle actually improves overnight, making it the perfect dessert for entertaining. The cake absorbs the juices, the flavors meld together, and you wake up to a dessert that's somehow better than when you assembled it. I dare you to taste this and not go back for seconds — even for breakfast.
Flexible Components: Each element can be made separately and stored, so you can spread the work across days if needed. Make the custard on Sunday, bake the cake on Tuesday, assemble on Friday. This recipe works around your schedule, not the other way around.
Visual Drama: We're talking Instagram-worthy layers that look like they belong in a boutique bakery, not your home kitchen. The contrast between the ruby berries, golden custard, and snow-white cream creates a dessert that looks as incredible as it tastes.
Comfort Factor: Despite looking fancy enough for a royal wedding, this tastes like the best version of every comforting dessert you've ever had. It's nostalgic and sophisticated all at once — like wearing a ballgown to a backyard barbecue and somehow pulling it off.
Adaptable Seasonality: While I call it a berry trifle, you can swap in whatever fruit is at its peak, making this a year-round superstar. Peaches in summer, pears in fall, citrus in winter — the technique stays the same, the results stay stunning.
Alright, let's break down exactly what goes into this masterpiece...
Inside the Ingredient List
The Foundation Players
The cake layer isn't just filler — it's the sponge that soaks up all the berry juices and sherry, becoming something entirely new. I use a simple vanilla pound cake, but here's the trick: we lightly toast it first. This dries it out just enough to absorb maximum flavor without becoming soggy. If you skip this step, you'll end up with a sad, mushy layer that tastes like disappointment. The slight caramelization from toasting adds a nutty depth that makes the whole dessert more complex.
Your berries are the stars here, so buy the best you can find. If you've ever struggled with this, you're not alone — and I've got the fix. Taste your berries before you start. If they're tart, add a touch more sugar. If they're perfect, barely sweeten them. Frozen berries work beautifully too — just thaw them completely and drain off the excess juice. That juice? Save it for cocktails or pour it over vanilla ice cream. Waste not, want not.
The Creamy Dream Team
The custard is where most recipes go wrong. They make it too sweet, too thick, or too vanilla-forward. We're going for a custard that's barely set, scented with vanilla but not overwhelmed by it. The egg yolks give it richness, but the cornstarch keeps it light enough to layer beautifully. Whole milk provides body without the heaviness of cream — save that for the whipped topping. If you try to use all cream in your custard, you'll end up with something closer to pudding, and the layers will slide apart like a dessert landslide.
Heavy cream for whipping should be cold — I'm talking straight-from-the-back-of-the-fridge cold. Warm cream won't whip properly, and you'll be left with a sad, liquid mess. I've been there, and it's not pretty. Add the powdered sugar gradually, tasting as you go. Some days I want barely-sweet clouds, other days I want something more dessert-like. The beauty of making it yourself is you control the sweetness.
The Unexpected Game-Changers
That tiny splash of sherry in the cake layer? Don't you dare skip it. It adds a warmth and complexity that makes people ask "what's in this?" in the best possible way. If you don't have sherry, use orange liqueur, rum, or even strong black tea. The point is to add another layer of flavor that makes the dessert more interesting than the sum of its parts. Picture yourself pulling this out of the refrigerator, the berries glistening like jewels — that tiny bit of alcohol makes all the difference.
Toasted almond slivers might seem like an afterthought, but they're the textural surprise that keeps each bite interesting. Toast them yourself — the pre-toasted ones from the store taste like cardboard. Just spread them on a baking sheet and pop them in a 350°F oven for 5-7 minutes. Your nose will tell you when they're done — that nutty aroma is absolute perfection.
Everything's prepped? Good. Let's get into the real action...
The Method — Step by Step
- Start with your cake — cube it into 1-inch pieces, spread them on a baking sheet, and pop them under the broiler for 2-3 minutes. Watch this part closely — they go from perfectly golden to burnt in seconds. You're looking for lightly toasted edges that will hold up to the berry juices. While they're still warm, dust them with your sherry. Not drown — think of it as a light perfume, not a bath. The warm cake absorbs the alcohol better, creating little pockets of flavor throughout each layer.
- Now for the berry mixture — toss your mixed berries with sugar and lemon juice, then let them sit. This is where the magic starts. The sugar draws out the juices, creating a natural syrup that's pure berry essence. Taste after 15 minutes and adjust. I once made this with honey instead of sugar for a friend who avoids refined sugar — game changer. The honey adds a floral note that plays beautifully with the vanilla in the custard.
- The custard comes next, and this next part? Pure magic. Whisk your egg yolks with sugar until they're pale and thick — about 2 minutes of vigorous whisking. This step incorporates air and starts building that silky texture we're after. Heat your milk until it's steaming but not boiling — around 180°F if you're using a thermometer. Pour the hot milk slowly into the egg mixture while whisking constantly. This is the moment of truth — pour too fast and you'll scramble your eggs. Nobody wants scrambled egg trifle.
- Back on the stove it goes, over medium heat, stirring constantly with a wooden spoon. Don't walk away from the stove here — custards are drama queens that will stick and burn if you glance at your phone. You'll know it's ready when it coats the back of the spoon and you can draw a clear line through it with your finger. Strain it through a fine-mesh sieve to catch any stubborn bits that might have scrambled. Stir in your vanilla and let it cool slightly before covering with plastic wrap pressed directly onto the surface. This prevents that annoying skin from forming.
- Whip your cream in a chilled bowl using chilled beaters — I keep mine in the freezer for 15 minutes before starting. This isn't just food snobbery — warm cream won't hold air properly, and you'll end up with a dense, heavy topping. Add the powdered sugar gradually, tasting as you go. Some days I want barely-sweet clouds, other days I want something more dessert-like. The beauty of making it yourself is you control the sweetness.
- Assembly time — and now the fun part. Start with a layer of cake in the bottom of your trifle bowl. Drizzle with a spoonful of the berry juice, then add a layer of berries. Spoon over custard, then repeat. The key is not to overthink it — rustic is beautiful here. Those perfectly layered trifles you see in magazines? They're often assembled by food stylists using tweezers. Your friends want to eat dessert, not admire geometry.
- Finish with a thick layer of whipped cream, swirling it into decorative peaks. Scatter your toasted almonds over the top, adding them just before serving so they stay crunchy. If you're making this ahead, cover with plastic wrap and refrigerate. The flavors actually improve overnight as everything melds together. I once made this three days ahead for a party — it was even better on day three.
- The final flourish — if you're feeling fancy, add some fresh mint leaves just before serving. They add a pop of color and a refreshing note that cuts through the richness. A dusting of powdered sugar through a fine sieve creates a snow-like finish that's pure romance. But honestly? Sometimes I skip all the garnishes and just let the layers speak for themselves. When each component is perfect, you don't need to dress it up.
That's it — you did it. But hold on, I've got a few more tricks that'll take this to another level...
Insider Tricks for Flawless Results
The Temperature Rule Nobody Follows
Most recipes tell you to serve trifle cold, but here's what actually works: let it sit at room temperature for 20 minutes before serving. This is hands down the best version you'll ever make at home. Cold cream can numb your taste buds, but slightly softened cream releases its flavors like a symphony warming up. The custard becomes silkier, the berries taste more like themselves, and the whole dessert just sings. I learned this the hard way when I served an ice-cold trifle to a food writer friend who diplomatically suggested I might want to "let it breathe a bit."
Why Your Nose Knows Best
Toast those almonds until they smell like marzipan had a baby with popcorn — that's when you know they're perfect. Under-toasted almonds taste like disappointment and won't add the crunch factor that makes this trifle legendary. Over-toasted ones taste like bitter regret. The sweet spot is about 6 minutes in a 350°F oven, shaking the pan every 2 minutes. Your kitchen should smell like an Italian bakery. If you're unsure, pull one out and taste it — it should be crunchy but not hard, nutty but not bitter.
The 5-Minute Rest That Changes Everything
After you assemble your trifle, let it rest for exactly 5 minutes before adding the final layer of cream. This gives the cake time to absorb some of the berry juices, creating a moisture barrier that prevents the cream from sliding off. It's like giving your dessert a chance to settle in and get comfortable before its final makeover. I discovered this by accident when I got distracted by a phone call mid-assembly. Best accident ever — that trifle stayed perfectly layered even after enthusiastic serving.
The Layering Secret of Trifle Masters
Don't pack your layers too tightly — leave breathing room between components. Over-packing creates a dense, heavy dessert where flavors compete instead of complement each other. Think of it like a well-edited outfit — each piece should have space to shine. Use a light hand when spooning in custard, let berries fall naturally, and don't press down on the cake. The result is layers that stay distinct but harmonious, like a perfectly orchestrated dinner party where everyone gets along but still brings their own personality.
Creative Twists and Variations
This recipe is a playground. Here are some of my favorite ways to switch things up:
The Tropical Vacation Version
Swap the berries for a mix of mango, pineapple, and passion fruit, use coconut milk in your custard, and add a splash of rum instead of sherry. Top with toasted coconut flakes and you'll swear you're eating dessert on a beach somewhere. I'll be honest — I ate half the batch before anyone else got to try it when I made this version for a luau party. The coconut custard is so good you'll want to eat it with a spoon straight from the fridge.
The Chocolate Lover's Dream
Add 2 tablespoons of cocoa powder to your custard and use chocolate pound cake instead of vanilla. Mix in some fresh raspberries for tartness, and you've got a trifle that tastes like the world's most sophisticated chocolate-covered berry. The contrast between the rich chocolate and bright berries creates a dessert that's impossible to stop eating. A friend tried skipping this step once — let's just say it didn't end well for her dinner party reputation.
The Autumn Comfort Edition
Replace berries with caramelized apples and pears, add a pinch of cinnamon to your custard, and use Calvados instead of sherry. The result tastes like someone captured fall in a bowl and topped it with clouds. This version is particularly stunning around Thanksgiving when you want something lighter than pie but still seasonally appropriate.
The Boozy Brunch Variation
Use champagne instead of sherry for soaking the cake, add a tablespoon of orange liqueur to your berries, and you've got the most elegant brunch dessert imaginable. The champagne keeps everything light and celebratory, while the orange adds a sophisticated note that pairs beautifully with coffee or mimosas.
The Kid-Friendly Classic
Skip the alcohol entirely and use orange juice to soak the cake. Use extra vanilla in the custard and let kids help with layering — they'll love building their own dessert. The result is sweet and simple, perfect for birthday parties or when you want all the trifle joy without the grown-up elements.
The Single-Serving Solution
Layer everything in individual mason jars for portable, portion-controlled desserts that stay fresh for days. These are perfect for picnics, lunch boxes, or when you want to feel fancy eating dessert on the couch. The jars keep everything contained and look adorable — plus, you can make a dozen different variations and let everyone choose their favorite.
Storing and Bringing It Back to Life
Fridge Storage
Cover your trifle bowl tightly with plastic wrap and it'll keep beautifully for up to 3 days in the refrigerator. The key is pressing the plastic wrap directly against the surface of the whipped cream to prevent it from absorbing fridge odors. Most recipes get this completely wrong. Here's what actually works: if you've already added the almond garnish, remove it before storing and add fresh ones when serving. The cream might deflate slightly, but a quick fluff with a spoon brings it right back to life. The flavors actually improve after a day as everything melds together into dessert harmony.
Freezer Friendly Components
While I don't recommend freezing the assembled trifle (the cream gets weird), you can freeze individual components like a pro. The custard freezes beautifully for up to a month — just thaw overnight in the fridge and give it a good whisk before using. Cake cubes can be frozen for up to 2 weeks, and actually work better when slightly frozen for assembly. They hold their shape and absorb the berry juices without getting mushy. The berry mixture can be frozen too, though the texture changes slightly. Use frozen berries for cooking into sauces or blending into smoothies, and save the fresh ones for garnish.
Best Rejuvenation Method
If your trifle has been sitting for a day and looks a bit tired, here's how to bring it back to life: add a fresh layer of lightly sweetened whipped cream on top, scatter some fresh berries, and maybe a few fresh mint leaves. It's like giving your dessert a spa day. Add a tiny splash of vanilla to the cream before whipping — it freshens everything up and makes it taste like you just made it. For individual servings that have been in the fridge, let them sit at room temperature for 10 minutes before serving. Cold mutes flavors, but slightly softened cream releases its vanilla notes and the berries taste more like themselves.