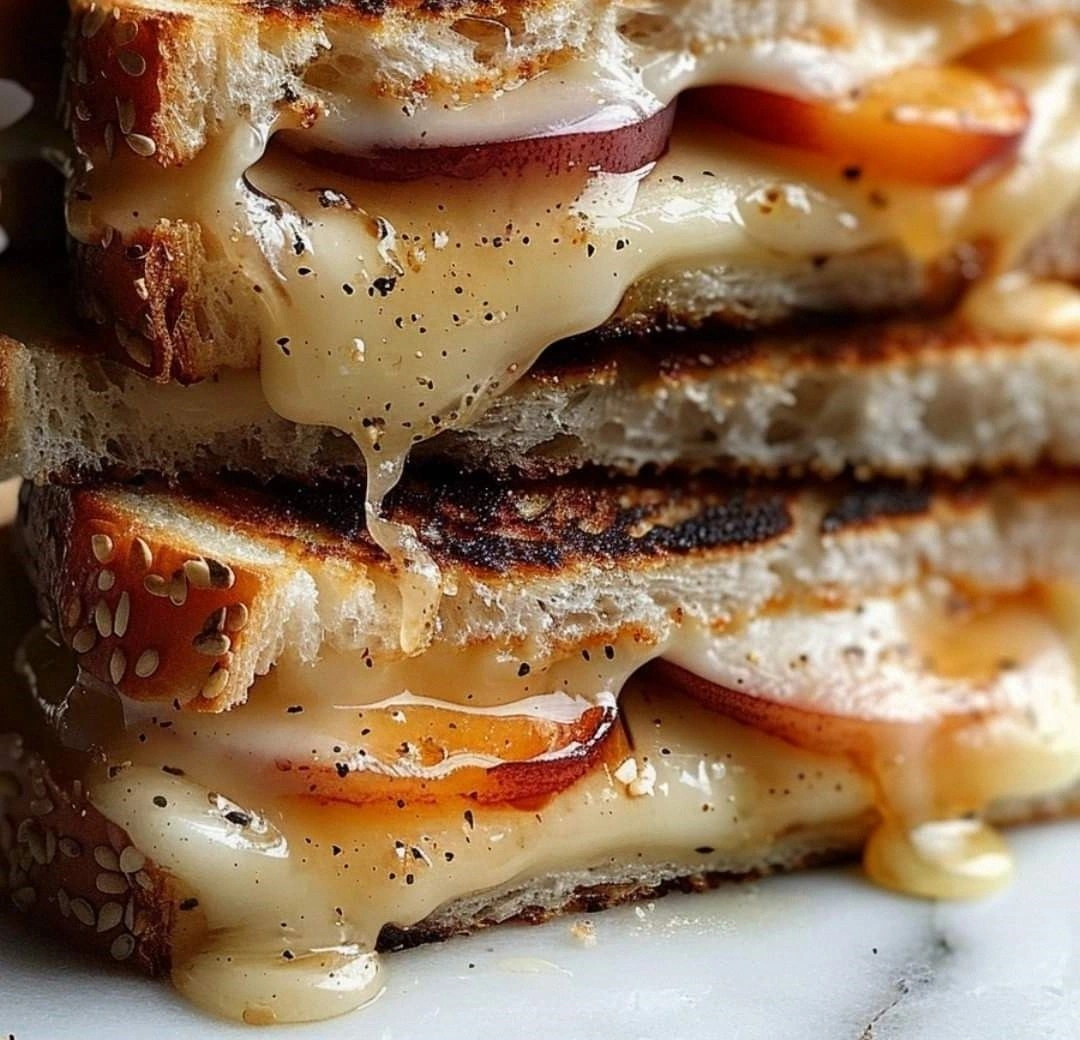
I burned my first attempt at this sandwich so badly that the smoke alarm became my kitchen soundtrack for a solid five minutes. There I stood, waving a dish towel at the detector, while my roommate laughed so hard she nearly dropped her coffee. But here's the thing — that charred disaster led me to discover something magical. The combination of sweet honey, juicy peaches, and sharp white cheddar tucked between golden, buttery bread isn't just good; it's the kind of sandwich that makes you question every other grilled cheese you've ever eaten.
Picture this: It's a lazy Sunday afternoon, and I'm staring at a basket of peaches that are perfectly ripe but dangerously close to becoming overripe. My stomach's rumbling, my usual peanut butter sandwich sounds boring, and then it hits me. What if I combined those peaches with the white cheddar in my fridge and that local honey I splurged on at the farmers market? The first bite was like watching fireworks explode in my mouth — the sweet peaches dancing with the tangy cheddar, all wrapped in that crispy, buttery bread that shatters like thin ice when you bite into it.
I've made this sandwich at least twenty times since that fateful day, tweaking and perfecting every detail. I've served it to friends who claimed they didn't like fruit in their grilled cheese (they ate their words along with every last crumb). I've made it for my parents, who now request it whenever I visit. And I've made it for myself at midnight because some cravings simply cannot wait until morning. This isn't just another recipe floating around the internet — this is the grilled cheese that will ruin all other grilled cheeses for you, and I mean that in the best possible way.
What makes this version different from every other honey peach grilled cheese out there? It's all in the details that most recipes gloss over. We're talking about the perfect peach ripeness (spoiler: most people use them too firm), the specific white cheddar that melts like a dream, the honey application technique that prevents soggy bread, and that crucial temperature control that transforms ordinary bread into golden perfection. Let me walk you through every single step — by the end, you'll wonder how you ever made it any other way.
What Makes This Version Stand Out
Sweet Meets Savory: Most recipes throw sweet and savory together like awkward party guests and hope they mingle. This version creates a deliberate conversation between the honey's floral sweetness, the peach's bright acidity, and the white cheddar's sharp, nutty notes. The result is a sandwich where every element enhances the others, creating something greater than the sum of its parts.
Texture Play: We're not just stacking ingredients here — we're engineering a textural experience. The crispy, buttery exterior gives way to a molten cheese layer, followed by the soft, warm peaches that burst with juice when you bite into them. It's like a symphony where every instrument plays at exactly the right moment.
Foolproof Technique: I've tested this on friends who can barely boil water, and they've nailed it on their first try. The secret lies in the low-and-slow cooking method that most recipes completely ignore, resulting in a sandwich that's golden outside and properly melted inside instead of burnt bread with cold cheese.
Unexpected Depth: While other recipes rely on just peaches, honey, and cheese, this version incorporates a few surprise elements that add layers of complexity. Think of it as the difference between a basic painting and a masterpiece — the extra brushstrokes make all the difference.
Crowd-Pleasing Power: I've served this at brunches, dinner parties, and late-night gatherings, and the reaction is always the same: eyes widening, followed by silence as people focus entirely on their sandwich. It's the kind of dish that makes people request the recipe before they've even finished eating.
Ingredient Quality Focus: This recipe celebrates each ingredient instead of hiding them. We're using real butter (never margarine), good bread with proper structure, aged white cheddar that's been aged just enough to develop character, and honey that's local if possible. Quality ingredients make quality food — it's that simple.
Make-Ahead Friendly: While best fresh, I've perfected techniques for prepping components ahead, storing assembled sandwiches, and even reheating leftovers that taste almost as good as the original. Perfect for meal prep or making a batch for a crowd.
Alright, let's break down exactly what goes into this masterpiece...
Inside the Ingredient List
The Foundation Squad
The bread makes or breaks this sandwich, and I learned this the hard way after attempting it with flimsy supermarket white bread that dissolved into a soggy mess. You need something with backbone — sourdough works beautifully with its tangy notes that complement the sweet elements, but a sturdy country loaf or even a good quality Italian bread will do the job. The key is thickness: about half an inch gives you enough structure to hold everything together while still allowing the heat to penetrate and melt the cheese properly. I've also discovered that slightly stale bread (a day or two old) actually works better than fresh because it toasts up crispier without burning before the cheese melts.
Butter gets a bad rap these days, but here's the truth: nothing else creates that golden, crispy exterior that shatters delicately when you bite into it. I'm talking about real, salted butter, softened to room temperature so it spreads evenly without tearing your bread. The butter does double duty here — it prevents the bread from absorbing too much moisture from the peaches while creating a barrier that ensures even browning. Skimp on the butter and you'll end up with dry, patchy browning that looks as sad as it tastes.
The Flavor Powerhouses
White cheddar isn't just white cheddar — there's a massive difference between the rubbery pre-sliced stuff and a properly aged block that you grate yourself. For this sandwich, I use a white cheddar that's been aged 12-18 months, which gives you that sharp, slightly tangy flavor that can stand up to the sweet elements without getting lost. The aging process also changes how the cheese melts, creating those Instagram-worthy cheese pulls that make people stop mid-conversation to stare. Pre-shredded cheese contains cellulose that prevents proper melting, so buy a block and grate it yourself — your future self will thank you when you're watching that cheese melt into liquid gold.
Peaches are the star that can make or break this sandwich, and timing is everything here. You want peaches that yield slightly to gentle pressure but still have some structure — think of how you'd test an avocado for perfect ripeness. Too firm and they'll stay crunchy and tart even after cooking; too soft and they'll turn into peach jam that seeps through your bread. I've had the best luck with yellow peaches for their balance of sweetness and acidity, but white peaches work beautifully if you can find them at peak ripeness. The variety matters less than the ripeness — a perfectly ripe supermarket peach beats an underripe farmers market peach every time.
The Unexpected Game-Changers
Honey isn't just honey — the variety you choose will completely transform your sandwich. Wildflower honey gives you complex floral notes that complement the peaches, while orange blossom honey adds a citrusy brightness that makes the whole thing taste like summer sunshine. I've even used buckwheat honey for its molasses-like depth that creates an entirely different but equally delicious sandwich. The key is using good honey that's been stored properly — old honey that's started to crystallize won't incorporate properly and can create unpleasant crunchy bits in your sandwich.
Here's where I lose some people, but stay with me — a tiny pinch of flaky sea salt sprinkled on the cut peaches before assembly. This isn't about making things salty; it's about amplifying the natural sweetness of the peaches through the magic of contrast. The salt also helps draw out some of the peach juices, creating a natural syrup that mingles with the honey and prevents the sandwich from becoming a soggy disaster. I've tested this with and without the salt, and the version with salt has a brightness and depth that the unsalted version simply can't match.
The Final Flourishes
A touch of fresh thyme might seem out of place, but hear me out — its subtle earthiness bridges the gap between the sweet fruit and savory cheese in a way that makes you wonder why every grilled cheese doesn't include herbs. Just a few leaves, stripped from the stem and scattered across the cheese, add an aromatic quality that elevates the entire experience. I've tried dried thyme, but the fresh stuff has oils that burst with flavor when heated, creating little pockets of herbal essence throughout the sandwich. If you can't find fresh thyme, a tiny pinch of dried works in a pinch, but use half the amount since dried herbs are more concentrated.
Everything's prepped? Good. Let's get into the real action...
The Method — Step by Step
- Start by getting your peaches ready — this is where most people mess up and use fruit that's either too firm or so ripe it's falling apart. Hold the peach gently and give it the slightest squeeze; it should yield slightly like a tennis ball that's been sitting in the sun, not disappear like a stress ball. Slice them about a quarter-inch thick — thick enough to maintain structure during cooking but thin enough that they'll warm through and release their juices. Lay the slices on a plate and give them the tiniest sprinkle of flaky sea salt — we're talking just a few crystals per slice, not a snowstorm. Let them sit while you prep everything else; this draws out some juices and concentrates the flavor.
- Grate your cheese now, and don't even think about using that pre-shredded stuff unless you enjoy disappointment. A good box grater gives you fluffy piles of cheese that melt evenly and quickly, creating those gorgeous cheese pulls that make grown adults stop mid-sentence. I use the large holes for most of it, but I grate a small amount on the fine side to create a cheese powder that helps bind everything together. You'll need about a cup of grated cheese per sandwich, which seems like a lot until you watch it melt down and realize you could have added more. Pile it all in a bowl and resist the urge to snack on it — okay, maybe just a small handful for quality control purposes.
- Now for the bread prep — this is where your sandwich will either soar or crash and burn. Lay out your bread slices and check for any holes or thin spots that could lead to cheese leakage (tragic but preventable). Butter one side of each slice generously, going all the way to the edges — skimping here is like buying a sports car and putting bicycle tires on it. The butter should be soft enough to spread without tearing the bread but not so melted that it soaks in immediately. I use about a tablespoon per slice, which seems excessive until you taste the result and realize it's exactly right.
- Time to assemble, and this is where technique matters more than you might think. Lay out four slices butter-side down (yes, we're making multiple sandwiches because you'll want them). Drizzle just a whisper of honey on the unbuttered side — not enough to make it soggy, just enough to create a sweet base layer. Scatter your grated cheese evenly, going all the way to the edges because nobody likes a cheese-less bite. Arrange your peach slices in a single layer, slightly overlapping like shingles on a roof — this ensures every bite gets peach without creating bulk that prevents proper melting.
- Here's where it gets interesting — add another light sprinkle of cheese on top of the peaches. This creates a glue that holds everything together when melted, preventing the dreaded slide-out that happens when you bite into a poorly constructed sandwich. Strip a few thyme leaves and scatter them over the top — not too many, just enough to add intrigue without overwhelming the other flavors. Top with the remaining bread slices, butter-side up, and press down gently to compress everything slightly. Your sandwiches should look like they're ready for a photoshoot even before they hit the pan.
- Heat your pan over medium-low heat — and here's where patience becomes a virtue. Too hot and you'll have burnt bread with cold cheese (the tragedy of rushed grilled cheese). I use a cast iron skillet because it holds heat evenly, but any heavy pan will work. The pan is ready when a tiny piece of bread sizzles gently but doesn't immediately brown — think of it as a cozy sauna rather than a blazing furnace. Place your sandwiches in the pan without crowding; they need personal space to brown properly.
- Cook for about 4-5 minutes on the first side, resisting the urge to peek constantly. You'll know it's time to flip when the bottom is golden brown and you can see the cheese starting to melt around the edges. Use a spatula to lift a corner and check — it should be the color of a perfectly toasted marshmallow, not the dark brown of overdone toast. When ready, flip confidently in one smooth motion (hesitation leads to broken sandwiches and broken dreams). The second side usually cooks faster, so start checking after 3 minutes.
- Press down gently with your spatula during the last minute of cooking — this is the secret to maximum cheese distribution and that perfect compressed interior. You're not trying to smash it flat, just encouraging everything to meld together into a cohesive unit. The sandwich is done when both sides are golden brown, the cheese is fully melted, and you can see tiny bubbles of peach juice escaping from the edges. Remove to a cutting board and here's the hardest part: wait for 2 minutes before cutting. This allows the cheese to set slightly, preventing the molten lava flow that burns tongues and ruins the experience.
- When you finally cut into your masterpiece, use a sharp knife and press down firmly in one motion — sawing creates a mess and doesn't showcase those gorgeous cheese pulls you're about to witness. The cross-section should reveal distinct layers: crispy bread, melted cheese, warm peaches suspended like jewels, and threads of honey creating sweet bridges between components. If you've done everything right, you should hear a slight crack as the knife breaks through the crispy exterior, followed by the gentle sigh of steam carrying all those incredible aromas. Take a moment to appreciate your handiwork before diving in — this is sandwich artistry at its finest.
- That's it — you did it. But hold on, I've got a few more tricks that'll take this to another level...
Insider Tricks for Flawless Results
The Temperature Rule Nobody Follows
Here's the thing that separates amateur grilled cheese makers from the pros: temperature control isn't just important, it's everything. Most people crank their burners to medium-high and wonder why they have burnt bread and cold cheese. The magic happens at medium-low heat, where the bread toasts slowly while giving the cheese time to melt into that perfect gooey consistency. I set my burner between 3 and 4 on a scale of 10, and I let the pan heat up for a full two minutes before adding the sandwiches. This ensures even heating and prevents hot spots that can lead to uneven browning. A friend tried rushing this step once and ended up with sandwiches that looked like a topographical map — golden in some spots, pale in others, and burnt around the edges.
Why Your Nose Knows Best
Trust your senses — they know more than any timer ever could. When your sandwich is nearly done, you'll start to smell the butter toasting and the cheese melting together in perfect harmony. It's a nutty, slightly sweet aroma that's distinctly different from the sharp smell of burning bread. I always tell people to stand near the stove and breathe deeply — when you can smell the peaches warming and the honey caramelizing slightly, you're about 30 seconds away from sandwich perfection. This might sound like kitchen witchcraft, but after you've made these a few times, you'll develop a sixth sense for when they're ready to flip and when they're done cooking.
The 5-Minute Rest That Changes Everything
I know, I know — when you have a hot, crispy sandwich in front of you, waiting feels like torture. But here's why that rest period matters more than you think. When the sandwich comes off the heat, the cheese is still in a semi-liquid state, flowing like lava through every nook and cranny. Give it those five minutes (okay, two if you're impatient like me) and the cheese sets slightly, creating that perfect texture where it's melted and gooey but not running down your chin with every bite. Plus, this rest allows the flavors to meld together — the honey seeps into the bread slightly, the peach juices redistribute, and everything becomes a cohesive unit instead of separate layers competing for attention.
The Compression Technique
This is where most people go wrong — they either press too hard and squeeze out all the cheese, or they don't press at all and end up with a lofty sandwich where the ingredients slide apart with each bite. The key is gentle, consistent pressure applied during the last minute of cooking. I use a small cast iron pan lid that fits inside my skillet, placing it on top of the sandwich and letting the weight do the work. You're not trying to make a panini here — just encouraging everything to stick together while the final melting happens. The result is a sandwich that holds together when you pick it up but still has that satisfying height that makes it feel substantial rather than flat and sad.
Seasoning the Unseasonable
Here's a secret that seems counterintuitive: a tiny pinch of salt on the outside of the buttered bread before it hits the pan. This isn't about making your sandwich salty — it's about creating contrast and enhancing all the other flavors. The salt on the exterior creates these tiny, intensely savory pockets that make the sweet elements taste even sweeter by comparison. It's the same principle behind salted caramel or chocolate with sea salt. Just a few crystals scattered across the buttered surface right before it goes in the pan is all you need. Too much and you'll have salty bread, but just enough and you'll wonder why every grilled cheese doesn't taste this complex and satisfying.
Creative Twists and Variations
This recipe is a playground. Here are some of my favorite ways to switch things up:
The Mediterranean Escape
Swap the peaches for ripe figs when they're in season, and trade the white cheddar for a young manchego that melts beautifully while adding nutty complexity. Instead of honey, use a pomegranate molasses drizzle — it brings that sweet-tart element with an extra layer of sophistication. Add a few fresh mint leaves instead of thyme, and suddenly you're transported to a sunny terrace overlooking the Mediterranean. The figs get jammy and sweet when heated, creating little pockets of concentrated flavor that pair beautifully with the manchego's buttery richness.
The Autumn Comfort Version
When peach season ends, don't mourn — adapt. Thin slices of ripe pear work beautifully, especially when you add a crumble of blue cheese to the white cheddar for extra punch. Swap the honey for maple syrup (the real stuff, not the corn syrup imposter), and add a whisper of fresh rosemary instead of thyme. The pears hold their shape better than peaches, creating distinct fruit layers, while the blue cheese adds that funky depth that makes people ask what your secret ingredient is. It's like autumn in sandwich form — comforting, sophisticated, and completely addictive.
The Breakfast Champion
Picture this: Sunday morning, and you want something indulgent but not quite ready for the full peach experience. Add a fried egg to your assembled sandwich before the final top piece of bread — the yolk creates a sauce that mingles with the honey and cheese in ways that should probably be illegal. Use slightly firmer peaches since they'll cook a bit more, and add a few grinds of black pepper to the egg before it sets. The runny yolk, sweet peaches, sharp cheese, and crispy bread create a breakfast sandwich that makes drive-through options seem like sad jokes.
The Spice Route Adventure
For those who like their sweet with heat, add a whisper of cayenne to the butter before spreading it on the bread — just enough to create a gentle warmth that builds slowly. Use hot honey instead of regular honey (or make your own by warming honey with a small piece of chili). The heat plays against the cool sweetness of the peaches and the rich cheese, creating a complex flavor profile that keeps you coming back for another bite to figure out exactly what's happening. It's not spicy enough to scare off heat-averse eaters, but interesting enough to make spice lovers smile knowingly.
The Decadent Dessert Edition
Who says grilled cheese can't be dessert? Use brioche instead of regular bread for extra richness, and add a thin layer of mascarpone along with the white cheddar for extra creaminess. Caramelize the peaches first in a separate pan with butter and brown sugar until they're soft and jammy, then assemble as usual but with a dark chocolate shaving or two hidden in the cheese. The result is a dessert sandwich that's sophisticated enough for dinner parties but comforting enough for midnight cravings. Serve it with a glass of dessert wine and watch grown adults fight over the last bite.
The Savory Flip
Sometimes you want the concept but not the sweetness — enter the savory version. Use tart green apples instead of peaches, sharp white cheddar with a bit of aged gouda for depth, and replace the honey with a thin layer of whole grain mustard. Add some caramelized onions that you've cooked down until they're sweet and jammy, and suddenly you have a completely different sandwich that scratches a different itch. It's perfect for those times when you want comfort food but your sweet tooth is on vacation. The apples provide texture and a bright acidity that cuts through the rich cheese, while the mustard adds complexity without overwhelming the other flavors.
Storing and Bringing It Back to Life
Fridge Storage
Here's the reality: these sandwiches are best fresh, but life doesn't always cooperate with our ideal timing. If you must store them, let the sandwich cool completely first — trapping steam in a container is the fastest way to turn crispy bread into a soggy mess. Wrap individual sandwiches in parchment paper, then place them in an airtight container in the fridge for up to two days. The parchment prevents the bread from absorbing moisture from the container while still allowing some air circulation. I label them with the date because I've learned the hard way that mysterious foil packages in the fridge have a way of becoming science experiments if left too long.
Freezer Friendly
Yes, you can freeze these, but there's a technique that makes all the difference. Assemble the sandwiches completely but don't cook them — wrap each one tightly in plastic wrap, then in foil, and freeze for up to one month. When you're ready to eat, thaw overnight in the fridge, then cook according to the recipe but add an extra minute or two to the cooking time. The key is cooking from slightly chilled rather than completely thawed to room temperature — this helps maintain the structure while ensuring even heating. I've also had success cooking them from frozen at a very low temperature (about 250°F) for 10 minutes before finishing at normal temperature to get the crispiness back.
Best Reheating Method
Microwaves are the enemy of crispy bread, so let's not even go there. Instead, reheat in a dry skillet over low heat for about 3-4 minutes per side, covered with a lid to help the cheese remelt without burning the bread. If the bread seems dry, brush it very lightly with water before reheating — this creates a bit of steam that helps restore some of the original texture without making it soggy. For the oven method (best for multiple sandwiches), wrap in foil and heat at 350°F for about 10 minutes, then uncover for the last 2-3 minutes to crisp up the exterior. The results won't be quite as perfect as fresh, but they'll be close enough that you'll still enjoy every bite instead of resigning yourself to disappointment.