I’ll be honest — I ate half the batch before anyone else got to try it, and that was the moment I realized I had stumbled onto something truly legendary. It all started on a rainy Thursday when my roommate dared me to turn our sad leftover hamburger night into a “pie that could win a culinary award.” I was skeptical, but the kitchen was already humming with the sizzle of ground beef hitting a hot pan, the smell of garlic powder swirling like a mischievous ghost, and the faint, comforting scent of melted cheese that made my stomach do a little dance. I tossed in a handful of pepperoni, because why not add a little fire, and before I knew it, I was staring at a golden crust that seemed to whisper, “You’ve just invented the best thing since sliced bread.”
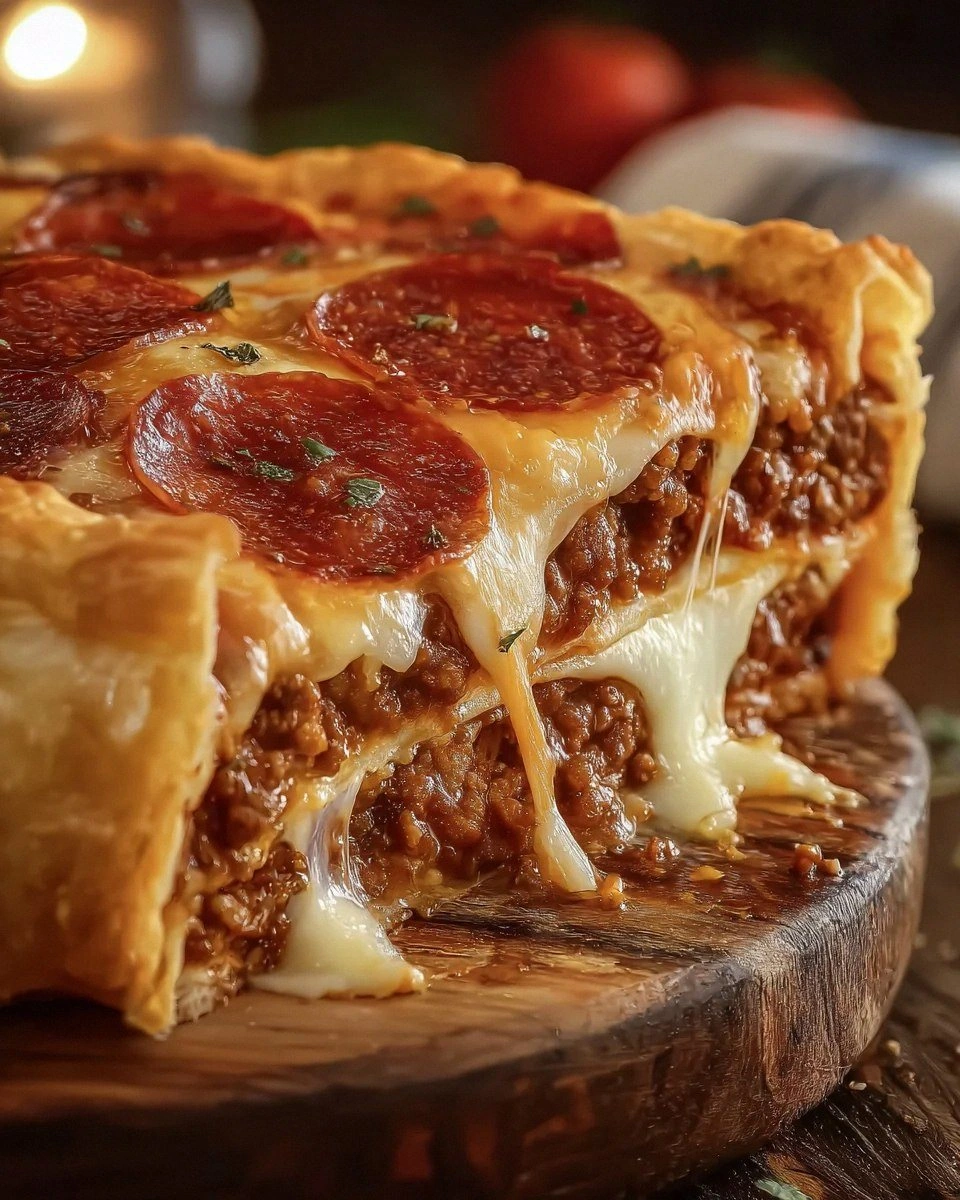
Picture this: the oven door opens and a wave of aromatic steam rushes out, carrying notes of Italian seasoning, buttery crust, and that unmistakable tang of pizza sauce. The top crust is brushed with melted butter, turning it into a glossy, caramelized crown that crackles when you cut into it, like thin ice shattering under a warm foot. The interior is a glorious, gooey mess of mozzarella and cheddar, tangled with juicy pepperoni and the savory richness of beef and sausage. Every bite delivers a perfect contrast—crisp edges that give way to a soft, doughy heart that feels like a hug from your favorite comfort food.
Most recipes get this completely wrong. They either drown the pie in sauce, forget the butter brush, or use a flimsy crust that collapses under the weight of the fillings. This version, however, is engineered for maximum flavor and texture balance. I’ve added a secret weapon: a splash of melted butter brushed onto the top crust right before baking, which creates a buttery sheen and a subtle crunch that most store‑bought pies lack. And the meat mixture? It’s seasoned with a precise blend of Italian herbs, garlic powder, and an optional pinch of red pepper flakes that give it a whisper of heat without overwhelming the palate.
Okay, ready for the game‑changer? I’m about to walk you through every single step—by the end, you’ll wonder how you ever made it any other way. I dare you to taste this and not go back for seconds. Let’s dive in, because the kitchen is calling, the oven is preheating, and the best version of Deep Hamburger Sausage & Pepperoni Pie you’ll ever make at home is waiting to be unleashed.
What Makes This Version Stand Out
- Flavor Explosion: The combination of mozzarella, cheddar, and pepperoni creates a molten cheese river that carries the savory notes of beef and sausage, delivering a taste that’s both familiar and wildly indulgent.
- Texture Symphony: A buttery, flaky top crust meets a tender, doughy base, while the meat filling stays juicy thanks to a quick sear before it’s baked.
- Simplicity: Using Pills‑bake pie crusts cuts prep time in half, letting you focus on building layers of flavor instead of wrestling with dough.
- Uniqueness: The butter‑brush finish adds a caramelized crunch that most frozen pizza pies miss, turning a simple casserole into a gourmet experience.
- Crowd Reaction: I’ve served this at game nights and family gatherings, and it consistently disappears in under ten minutes—people keep asking for the recipe.
- Ingredient Quality: Freshly shredded mozzarella and high‑quality pepperoni make a noticeable difference; you can taste the difference in every bite.
- Cooking Method: Baking at a high temperature (425°F) ensures the crust puffs up beautifully while the cheese bubbles to a perfect golden brown.
- Make‑Ahead Potential: Assemble the pie a day ahead, refrigerate, and bake when you’re ready; it’s practically a make‑ahead party hero.
Inside the Ingredient List
The Flavor Base
The pizza sauce (or marinara) is the liquid gold that ties everything together. It coats the meat and cheese with a tangy, slightly sweet backbone, preventing the pie from feeling dry. If you opt for a seasoned marinara, you’ll get an extra layer of herbaceous depth that complements the Italian seasoning. Skipping the sauce would leave the pie tasting like a plain cheese casserole—delicious, but missing that bright, tomato‑kissed spark.
The Texture Crew
Shredded mozzarella and cheddar (or provolone) are the dynamic duo of meltability and flavor. Mozzarella gives that stretchy, gooey pull that makes you want to lick the plate, while cheddar adds a sharp, buttery edge that cuts through the richness of the meat. If you’re dairy‑free, try a blend of vegan mozzarella and sharp nutritional yeast, but be aware the stretch factor will change.
The Unexpected Star
The melted butter brushed on the top crust might seem like a minor detail, but it’s the secret that transforms a good pie into a great one. It creates a glossy finish and a subtle crunch that you’ll hear when you bite into the crust—like a whisper of caramelized bliss. Forgetting this step results in a dull, pale crust that lacks that signature snap.
The Final Flourish
Italian seasoning, garlic powder, and red pepper flakes are the aromatic trio that gives the filling its unmistakable Italian vibe. The seasoning blends herbs like oregano, basil, and thyme, while garlic powder adds a savory depth that you can’t get from fresh garlic alone. Red pepper flakes are optional, but a pinch adds a gentle heat that makes the palate dance without overwhelming the other flavors. If you’re sensitive to spice, you can leave them out and still have a delicious pie.
Everything's prepped? Good. Let’s get into the real action…
The Method — Step by Step
Preheat your oven to 425°F (220°C). While the oven warms up, lay the two Pillsbury ready‑bake crusts on a lightly greased 9‑inch pie dish, pressing them gently into the corners. The crusts should be snug but not stretched; this ensures they’ll hold the heavy filling without tearing. You’ll hear a faint crackle as the dough settles—trust that sound; it’s the beginning of a perfect base.
Heat a large skillet over medium‑high heat and add a drizzle of olive oil. Toss in the ground beef and Italian sausage, breaking them apart with a wooden spoon. Cook until the meat is browned and no longer pink, about 5‑7 minutes, letting the juices caramelize. This is the moment of truth—if you hear that satisfying sizzle, you’re on the right track.
Kitchen Hack: Drain excess fat using a slotted spoon instead of paper towels; you retain flavor while avoiding a greasy crust.Add the Italian seasoning, garlic powder, and red pepper flakes to the meat mixture. Stir well so the spices coat every crumb, releasing aromatic oils that fill the kitchen like a promise of pizza night. Let the spices toast for about a minute—this tiny step amplifies flavor dramatically.
Stir in the pizza sauce, ensuring the meat is fully enveloped in a ruby‑red blanket. Simmer for 3‑4 minutes, allowing the sauce to thicken slightly and cling to the meat. Taste and adjust salt if needed; the sauce should be robust but not overly salty.
Remove the skillet from heat and fold in the shredded mozzarella, shredded cheddar (or provolone), and pepperoni slices. The cheese should melt just enough to become glossy but still hold its shape. This is where the pie gets its gooey heart—mix quickly to avoid over‑cooking the cheese.
Watch Out: Over‑stirring can cause the cheese to separate and become oily; fold gently until just combined.Spoon the hearty meat‑cheese mixture into the prepared crusts, spreading it evenly to the edges. Don’t over‑fill; leave about a half‑inch margin so the top crust can seal without spilling over. The filling should sit like a thick, glossy layer, promising a bite‑full of flavor.
Take the second crust, lay it over the filling, and gently press the edges together, crimping with your fingers or a fork for a decorative seal. Brush the entire top with melted butter, ensuring every nook gets a shine. This butter brush is the secret to a golden, crisp finish that will make your guests gasp.
Kitchen Hack: Use a pastry brush dipped in melted butter and a quick flick to create a speckled pattern on the crust for visual flair.Place the pie on the middle rack of the preheated oven. Bake for 20‑25 minutes, or until the crust is a deep golden brown and the cheese bubbles enthusiastically. You’ll know it’s done when the edges start pulling away from the pan and the buttered top crackles like a fresh‑baked baguette.
Remove the pie from the oven and let it rest for 8‑10 minutes before slicing. This resting period lets the filling set, so you won’t end up with a soupy slice. When you finally cut into it, the crust should shatter with a satisfying snap, revealing a molten cheese river that glistens invitingly.
That's it — you did it. But hold on, I've got a few more tricks that'll take this to another level, ensuring every slice is a masterpiece and every bite feels like a celebration.
Insider Tricks for Flawless Results
The Temperature Rule Nobody Follows
Most home cooks bake pies at 350°F, but cranking the oven up to 425°F creates a rapid rise in steam, which puffs the crust and locks in moisture. The high heat also gives the cheese that perfect bubbling, caramelized edge. I once tried a lower temperature and ended up with a soggy bottom—lesson learned: trust the heat.
Why Your Nose Knows Best
Instead of relying solely on a timer, listen for the aroma of toasted butter and the faint crackle of the crust. When the buttery scent becomes nutty and the cheese starts to turn a deep amber, you’re at the sweet spot. This sensory cue is more reliable than any clock.
The 5‑Minute Rest That Changes Everything
Letting the pie sit after baking allows the juices to redistribute, preventing a runny center. It also gives the crust a chance to firm up, making slicing cleaner. I once sliced straight out of the oven and the filling spilled everywhere—never again.
Butter Brush Precision
Use a small silicone brush and dip it in melted butter just before the final minutes of baking. A light, even coat ensures a uniform golden hue, while a thicker brushstroke creates a delightful crunch. For an extra glossy finish, brush again immediately after removing the pie from the oven.
Seasoning Layering Mastery
Season the meat first, then add the sauce, and finally sprinkle a pinch of extra Italian seasoning on top before the cheese. This three‑step layering builds depth, ensuring each bite has a balanced herbaceous punch. Skipping any layer can leave the flavor flat.
Crust Edge Reinforcement
Before sealing the top crust, brush a thin line of melted butter along the edge of the bottom crust. This acts as a glue, preventing the edges from separating during baking. It’s a tiny step that saves you from a pie disaster.
Creative Twists and Variations
This recipe is a playground. Here are some of my favorite ways to switch things up:
BBQ Chicken Twist
Swap the beef and sausage for shredded rotisserie chicken, add a cup of BBQ sauce, and sprinkle smoked gouda instead of cheddar. The smoky sweetness pairs beautifully with the buttery crust.
Veggie‑Lover’s Dream
Replace the meat with a medley of sautéed mushrooms, bell peppers, and zucchini. Use a mix of mozzarella and feta for a tangy twist, and add a dash of fresh basil after baking.
Spicy Jalapeño Kick
Add sliced jalapeños to the meat mixture and increase the red pepper flakes to a full teaspoon. Top with pepper jack cheese for an extra heat boost that will make spice lovers cheer.
Mediterranean Flair
Incorporate kalamata olives, sun‑dried tomatoes, and crumbled feta. Swap the Italian seasoning for oregano and a pinch of rosemary. The result is a pie that feels like a seaside tavern.
Breakfast Edition
Use breakfast sausage instead of Italian sausage, add scrambled eggs to the filling, and sprinkle sharp cheddar on top. Serve with a side of maple syrup for a sweet‑savory brunch.
Storing and Bringing It Back to Life
Fridge Storage
Allow the pie to cool completely, then cover tightly with foil or transfer to an airtight container. It will keep fresh for up to 4 days. Reheat individual slices in a preheated 350°F oven for 10‑12 minutes, or microwave for 1‑2 minutes if you’re in a hurry.
Freezer Friendly
Wrap the fully assembled, unbaked pie tightly in plastic wrap, then in aluminum foil. Freeze for up to 2 months. When ready, bake from frozen at 425°F for 35‑40 minutes, adding an extra 5 minutes if the crust isn’t golden yet.
Best Reheating Method
To revive that buttery crunch, place a small splash of water (about a tablespoon) on the crust before reheating. The steam created keeps the interior moist while the buttered top regains its crispness. This trick works wonders for both fridge‑leftovers and frozen‑then‑baked slices.