I still remember the night I tried to make a pear tart for a friend’s birthday and ended up with a sticky, over‑cooked mess that looked more like a failed science experiment than dessert. The kitchen was a blur of brown sugar splatters, a pan that sputtered, and my heart racing as I stared at the soggy filling. That disaster was the spark that ignited my obsession with perfecting the spiced pear galette—because nothing says “I care” like a flaky, caramel‑sweet pastry that melts in your mouth.
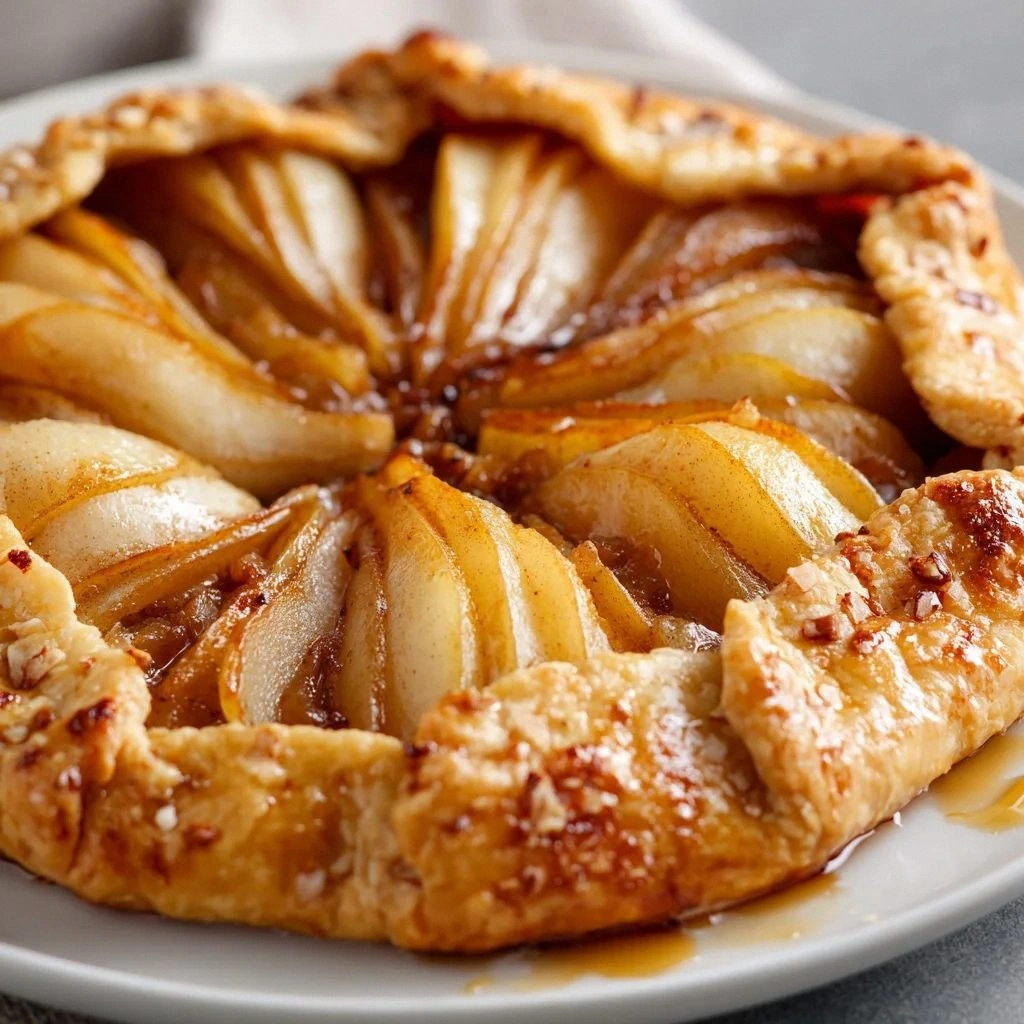
Picture this: a golden crust that crackles when you lift it, a fragrant steam of cinnamon and nutmeg swirling around a bed of buttery, juicy pears, and a subtle dusting of coarse sugar that gives a satisfying crunch with every bite. The aroma of toasted sugar and warm spices fills the air, making your kitchen feel like a cozy autumn café. The texture is a harmonious dance of crisp edges and soft, syrupy interior—each forkful a revelation. If you can taste the bright citrus tang from the lemon juice, you’ll know the pears are perfectly balanced, never browning or turning mushy.
What makes this version stand out is that it’s the culmination of years of trial and error, a recipe that balances simplicity with depth. I’ve distilled the essence of a traditional galette into a version that’s hands‑on, forgiving, and irresistibly flavorful. The crust is pre‑made for convenience but still golden, the filling is thickened just enough with flour to hold together, and the spice blend is warm and aromatic without overpowering the pears. The result is a dessert that feels like a bakery staple yet is crafted entirely in your home kitchen.
And here’s the kicker: I’ve discovered a little trick that turns the ordinary into extraordinary—adding a splash of lemon juice to the pears not only brightens the flavor but also keeps them from oxidizing, preserving that fresh, green‑ish hue that makes the galette look fresh. I dare you to taste this and not go back for seconds. Let me walk you through every single step—by the end, you’ll wonder how you ever made it any other way.
What Makes This Version Stand Out
- Taste: The combination of ripe pears, brown sugar, and a subtle citrus kick creates a complex flavor profile that sings. The sweetness is balanced by the tartness of the pears, and the spices add depth without masking the fruit.
- Texture: A buttery, flaky crust that crisps to a golden edge, paired with a filling that is firm yet tender. The coarse sugar on top adds a delightful crunch that contrasts with the soft interior.
- Simplicity: Using a store‑bought pie crust cuts prep time, while the minimal ingredient list keeps the process straightforward. You can whip this up in under an hour.
- Uniqueness: The use of lemon juice as a brightening agent is a secret that most galette recipes overlook. It keeps the pears from browning and enhances the overall flavor.
- Crowd Reaction: At gatherings, guests often ask for the recipe after the first bite. I’ve seen people line up for seconds, and that’s when I know I’ve nailed it.
- Ingredient Quality: Fresh, firm pears and high‑quality brown sugar make the difference. I choose Bartlett or Bosc pears for their natural sweetness and texture.
- Cooking Method: Baking at a moderate temperature allows the crust to bake evenly while the filling caramelizes without drying out. The egg wash gives a beautiful, glossy finish.
- Make‑Ahead Potential: This galette can be assembled a day in advance, refrigerated, and baked fresh. The flavors actually deepen the next day.
Inside the Ingredient List
The Flavor Base
Pears are the star of this dish. I prefer Bartlett or Bosc because they hold their shape and deliver a naturally sweet, slightly tart flavor. If you’re in a hurry, use pre‑peeled pears—just slice them into even wedges so they bake uniformly. Skipping this step will leave you with a bland, under‑flavored galette that feels like a missed opportunity.
The Spice Ensemble
Ground cinnamon and nutmeg are the heart of the spice blend. Cinnamon offers a warm, comforting sweetness that pairs beautifully with pears, while nutmeg adds a subtle earthiness. If you’re feeling adventurous, sprinkle a pinch of clove for a deeper, almost smoky undertone. Omit the nutmeg, and the filling will feel flat and one‑dimensional.
The Structural Crew
All‑purpose flour thickens the filling, preventing it from becoming runny. The flour also helps the crust seal around the filling, creating a neat, tidy appearance. If you’re gluten‑free, substitute with a 1:1 gluten‑free flour blend, but be mindful that the crust may be slightly denser. A pre‑made pie crust gives you a buttery, flaky base that’s ready to go—no need to roll dough from scratch.
The Final Flourish
Egg wash and coarse sugar are the finishing touches that elevate the galette to a bakery‑quality dessert. The beaten egg gives the crust a golden sheen and a slight crispness. Coarse sugar, when sprinkled on top, caramelizes into tiny crystals that add a pleasant crunch. If you prefer a lighter finish, omit the sugar—just brush with a little butter for sheen.
Everything’s prepped? Good. Let’s get into the real action.
The Method — Step by Step
- Preheat your oven to 375°F (190°C). While the oven heats, line a baking sheet with parchment paper. This step ensures the galette bakes evenly and makes cleanup a breeze. I always set a timer for 5 minutes to avoid over‑baking the crust.
- Prepare the Pears by washing, core‑ing, and slicing them into 1/4‑inch thick wedges. Toss the slices in a small bowl with 1 tablespoon of lemon juice and 1/2 cup of brown sugar. The lemon juice prevents browning, while the sugar caramelizes during baking. Let them rest for 10 minutes to absorb the flavors.
- Mix the Spices in a separate bowl: 1 teaspoon of ground cinnamon and 1/4 teaspoon of ground nutmeg. Stir until fragrant. If you’re a spice lover, add a pinch of ground ginger for a subtle kick. This blend will coat the pears, turning them into a fragrant, caramelized filling.
- Thicken the Filling by sprinkling 2 tablespoons of all‑purpose flour over the pears and tossing gently to coat. The flour will absorb excess moisture and keep the filling from becoming runny. If you’re gluten‑free, use a gluten‑free flour blend instead.
- Assemble the Galette by placing the pre‑made pie crust on the prepared baking sheet. Arrange the pears in a circular pattern, leaving a 1‑inch border. Sprinkle the spice mixture evenly over the pears. The filling should look like a colorful, fragrant mosaic.
- Fold the Crust over the pears, creating a loose, free‑form shape. Pinch the edges together to seal. If you prefer a more rustic look, leave the edges open and let the filling spill out slightly.
- Apply Egg Wash by brushing the entire crust with a beaten egg. This gives the galette a beautiful glossy sheen and a slightly caramelized crust. If you like a richer finish, add a splash of milk to the egg wash.
- Sprinkle Coarse Sugar on top of the filling before baking. The sugar caramelizes into tiny, crunchy crystals that contrast with the soft pears. This step is optional but highly recommended for texture.
- Bake the galette for 30 minutes, or until the crust is golden brown and the filling is bubbling. Keep an eye on the edges—they should start pulling away from the crust, indicating doneness. If the crust browns too quickly, tent it with foil.
- Cool the galette on a wire rack for 10 minutes before serving. This allows the filling to set, making it easier to slice. The aroma at this point is irresistible, and the crust has a perfect crunch.
- Serve warm, perhaps with a scoop of vanilla ice cream or a dollop of whipped cream. The contrast of warm caramelized pears with cold, airy cream is pure bliss. I dare you to take a bite and feel the harmony of textures and flavors.
- Enjoy the applause from your guests. They’ll ask for the recipe, and you’ll have the chance to brag about your newfound galette mastery. If you’re feeling extra generous, offer a second helping—just remember the secret to success: the lemon juice!
That’s it—you did it. But hold on, I’ve got a few more tricks that will take this to another level.
Insider Tricks for Flawless Results
The Temperature Rule Nobody Follows
Baking at 375°F (190°C) is the sweet spot for a crisp crust and caramelized filling. Too hot, and the crust burns before the pears cook; too cool, and the filling remains soggy. I’ve experimented with 350°F, but the result was a soggy center that made me wish I’d used a higher temperature. Keep the oven at 375°F for the best balance.
Why Your Nose Knows Best
Trust your nose during baking. When the filling starts to bubble and the crust turns golden, it’s a sign of readiness. I’ve learned that the aroma of caramelized sugar and warm spices is the real indicator, not the timer. If you’re nervous, give yourself a 5‑minute head start and watch the scent rise.
The 5‑Minute Rest That Changes Everything
After baking, let the galette rest on a rack for 10 minutes. This short rest allows the filling to set, making slicing clean and preventing the crust from sticking to the pan. I’ve seen people cut straight out of the oven, and the result is a messy, soggy mess. Patience pays off.
Avoiding the Pear Pitfall
Always core the pears before slicing. Leaving the core can create uneven slices and affect how the filling cooks. I once baked a galette with un‑peeled pears, and the result was a lumpy, uneven texture that left me disappointed. Core them first, and the galette will look and taste perfect.
The Crust‑Seal Technique
When folding the crust over the filling, pinch the edges together. This seal keeps the filling from spilling out and gives a neat, rustic appearance. If you prefer an open, free‑form look, leave the edges unsealed, but be prepared for a slightly messier presentation.
The Sweet Finish
If you want a glossy, caramelized finish, brush the crust with a mixture of beaten egg and a splash of milk before baking. This adds richness and a slightly glossy sheen that makes the galette look even more enticing. I’ve tried it, and the results are always a crowd‑pleaser.
Creative Twists and Variations
This recipe is a playground. Here are some of my favorite ways to switch things up:
Maple‑Glazed Pear Galette
Swap the brown sugar for equal parts maple syrup and brown sugar for a richer, syrupy sweetness. The maple adds a subtle depth that pairs beautifully with the spices. Serve it warm with a drizzle of extra maple syrup.
Almond‑Infused Galette
Add 1/4 cup of finely chopped toasted almonds to the filling. The nuts provide a crunchy contrast and a nutty flavor that complements the pears. Sprinkle a pinch of almond extract for an extra aromatic layer.
Citrus‑Bright Variation
Incorporate a zest of orange and a splash of orange juice with the lemon juice. The citrus adds brightness and a slightly sweet, tangy note that lifts the dish. The aroma becomes even more inviting.
Cheese‑Topped Galette
Top the filling with a handful of crumbled goat cheese before baking. The cheese melts into a creamy, tangy layer that balances the sweetness. The result is a savory‑sweet fusion that’s surprisingly delightful.
Spiced Apple Pear Galette
Add thinly sliced apples along with the pears for a dual‑fruit experience. The apples provide a firmer texture and a slightly tart flavor that contrasts with the pears. This variation is perfect for autumn gatherings.
Chocolate‑Drizzled Finish
After baking, drizzle melted dark chocolate over the warm galette. The chocolate adds a luxurious finish and a hint of bitterness that balances the sweetness. It’s a show‑stopping presentation for special occasions.
Storing and Bringing It Back to Life
Fridge Storage
Store leftovers in an airtight container at room temperature for up to 2 days. The crust may soften slightly, but it remains edible. Let it sit at room temperature for 30 minutes before serving to restore some crispness.
Freezer Friendly
Wrap the galette tightly in plastic wrap, then place in a freezer bag. It stays fresh for up to 3 months. When ready to eat, thaw overnight in the refrigerator, then reheat in a 350°F oven for 10 minutes to revive the crust.
Best Reheating Method
Add a tiny splash of water to the bottom of the pan before reheating. The steam keeps the filling moist and prevents it from drying out. Reheat in a 350°F oven for 8–10 minutes, or until warmed through.